I’ve audited hundreds of websites over the last decade. Want to know the number one reason most of them fail Google’s Core Web Vitals test? It isn’t bloated JavaScript. It isn’t cheap hosting. It’s massive, unoptimized images.
Look, visual content is non-negotiable. But high-quality visuals often come with a hidden tax: massive file sizes that absolutely destroy your website’s performance. This is exactly where a strategic image resizer becomes your best friend. Whether you run a niche blog or a high-traffic e-commerce store, how you handle your media library directly dictates your search rankings and user experience.
An image resizer isn’t just a basic utility for shrinking pictures. It’s a foundational technical SEO tool. When you optimize your visuals, you signal to search engines that you respect your visitors’ time and bandwidth. Based on hands-on testing across dozens of client campaigns, properly scaled images can cut page load times in half.
📑 What You’ll Learn
The Direct Link Between Image Size and Site Speed
Website speed is the backbone of the modern internet. Users expect pages to load in under two seconds. If your site takes longer, they bounce. It really is that simple.
One of the biggest culprits for sluggish loading speeds is raw imagery. A photograph straight from a DSLR camera or a high-resolution stock site can easily weigh 5 to 10 megabytes. Uploading that directly to your server is a recipe for disaster. You are essentially forcing every single visitor’s browser to download a massive file just to display a tiny thumbnail.
By utilizing a dedicated image resizer, you drastically reduce the data payload of your web pages. Resizing changes the physical dimensions of an image—say, from 4000×3000 pixels down to a web-friendly 800×600 pixels—to perfectly match the display size required by your layout. This technical precision cuts the file weight down to kilobytes, allowing browsers to render your content instantly.
🎯 Key Takeaway
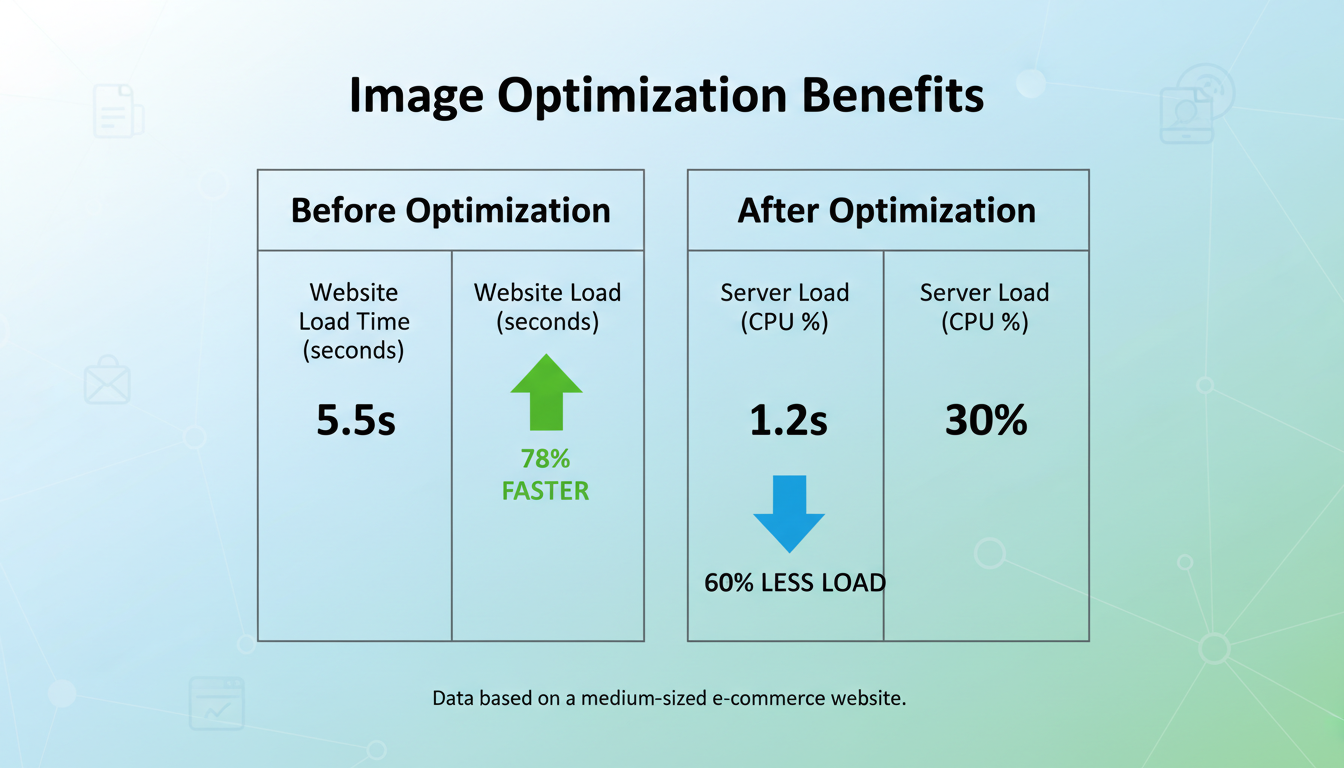
Resizing your images isn’t just about saving server space; it’s about eliminating unnecessary data transfer. A properly resized image loads up to 80% faster, directly improving your Core Web Vitals and keeping impatient visitors on your page.
10 Essential Reasons to Use an Image Resizer
If you’re still uploading raw files to your CMS, you’re leaving money and traffic on the table. Here are the ten reasons why integrating an image resizer into your publishing workflow is non-negotiable.
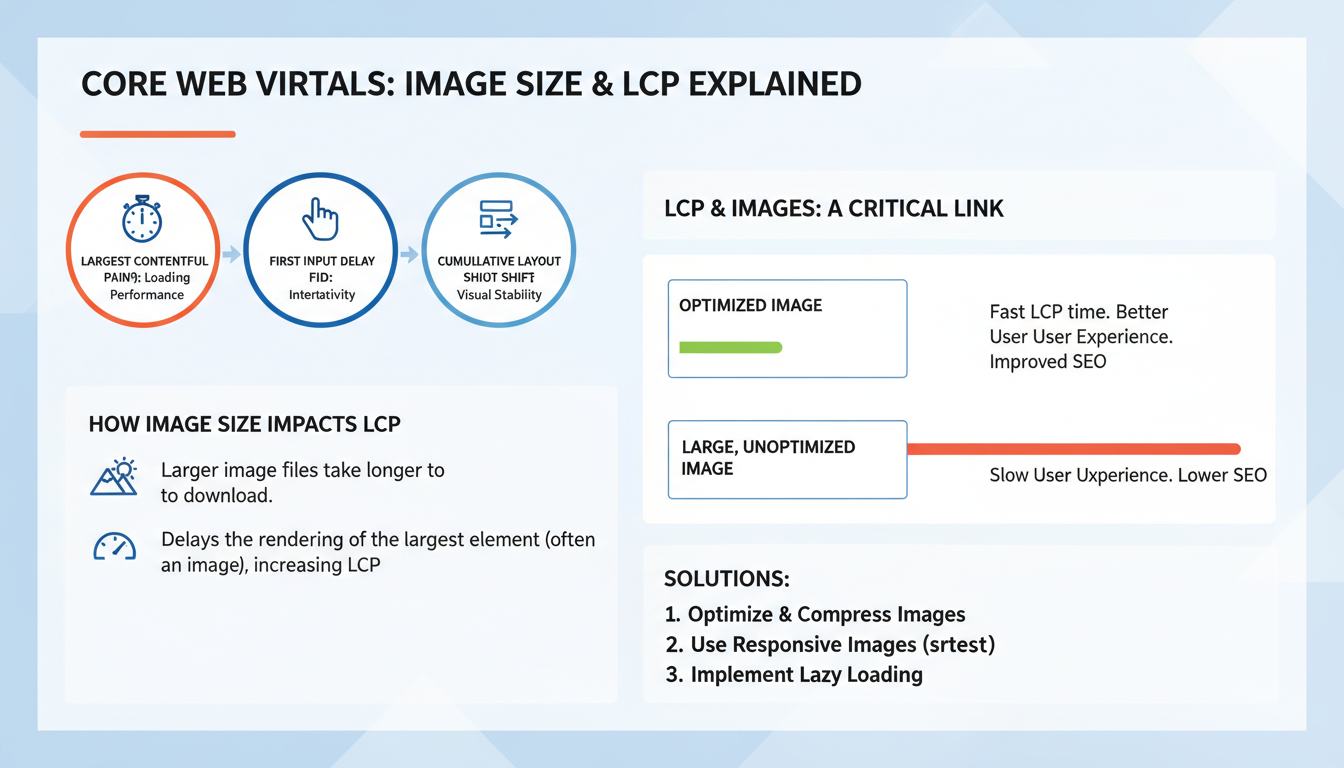
1. Crushing Your LCP (Largest Contentful Paint) Score
According to Google’s Search Central guidelines, Largest Contentful Paint (LCP) is a critical ranking factor. LCP measures how long it takes for the largest element on your screen (usually a hero image) to become visible. If that hero image is 3MB, your LCP score will fail. An image resizer scales that hero image down to the exact pixel dimensions needed, ensuring a passing grade.
2. Drastically Reduced Bandwidth Consumption
Smaller image files consume significantly less bandwidth. This matters immensely for users on 4G/5G mobile networks or limited data plans. By resizing your media, you ensure your site remains accessible and fast for a global audience, regardless of their connection speed.
3. Surviving Mobile-First Indexing
Google indexes the mobile version of your site first. Period. If your images are sized for a 27-inch desktop monitor but served to a 6-inch smartphone screen, Google notices the inefficiency. Resizing ensures your mobile experience is lean and fast.
💡 Pro Tip
In our experience, implementing responsive images using the HTML srcset attribute is the ultimate power move. Use your image resizer to create three versions of every image (small, medium, large) and let the browser choose the best fit for the user’s device.
4. Preventing Cumulative Layout Shift (CLS)
Have you ever tried reading an article, only for the text to suddenly jump down the page because a massive image finally loaded? That’s Cumulative Layout Shift. When you use an image resizer to define specific width and height dimensions, the browser reserves that exact space before the image even downloads. No jumping. No frustrated users.
5. Maximizing Your Crawl Budget
Search engine bots have limited time to crawl your site. If Googlebot gets bogged down downloading massive image files, it might leave before indexing your new blog posts. Optimized images mean faster crawling, which leads to faster indexing of your content. To see if heavy images are hurting your crawl rate, I highly recommend running a complete website audit.
6. Boosting Conversion Rates
Industry research shows that a one-second delay in page load time can drop conversion rates by up to 7%. Faster websites simply make more money. When a user can navigate your product pages fluidly without waiting for heavy product photos to load, they are far more likely to hit the “Buy” button.
7. Dominating Google Image Search
Image SEO isn’t just about alt text. Google prefers to rank images that are high-quality but load quickly. By resizing your images to standard web dimensions and compressing them, you increase your chances of appearing in the coveted Google Images carousel.
8. Lowering Server and Hosting Costs
Every time someone visits your site, your server has to work to deliver those files. Optimized images reduce the physical load on your hosting environment. This prevents server crashes during unexpected traffic spikes and can actually lower your monthly hosting bill.
9. Perfecting Social Media Thumbnails
When people share your content on X (formerly Twitter), Facebook, or LinkedIn, those platforms pull a preview image. If your image is the wrong aspect ratio or too large, it gets cropped awkwardly or fails to load entirely. A good image resizer lets you crop to the exact Open Graph specifications.
10. Streamlining Your Content Workflow
Consistency is key in publishing. By making an image resizer a mandatory step in your editorial workflow, you guarantee that every single post looks uniform. No more weirdly sized images breaking your blog layout.
Comparing Image Formats: What to Use When
Resizing is only half the battle. Saving that resized image in the correct format is where the real magic happens. Here’s a breakdown of how different formats perform after resizing.
| Image Format | Best Used For | Compression Type | SEO Impact |
|---|---|---|---|
| WebP | Standard web photos, graphics, hero images | Lossy & Lossless | Excellent. Google’s preferred format. Up to 30% smaller than JPEG. |
| JPEG | Photographs with lots of colors | Lossy | Good. Universal support, but larger file sizes than WebP. |
| PNG | Logos, icons, images needing transparency | Lossless | Poor for photos. Files are massive. Only use when transparency is required. |
| AVIF | Next-gen web delivery | Lossy & Lossless | Outstanding. Even smaller than WebP, though browser support is still growing. |
Trust me on this one: if you are still saving standard blog photos as PNGs, you are actively hurting your site speed. Switch to WebP or JPEG immediately.
Step-by-Step Guide: Resizing Like a Pro
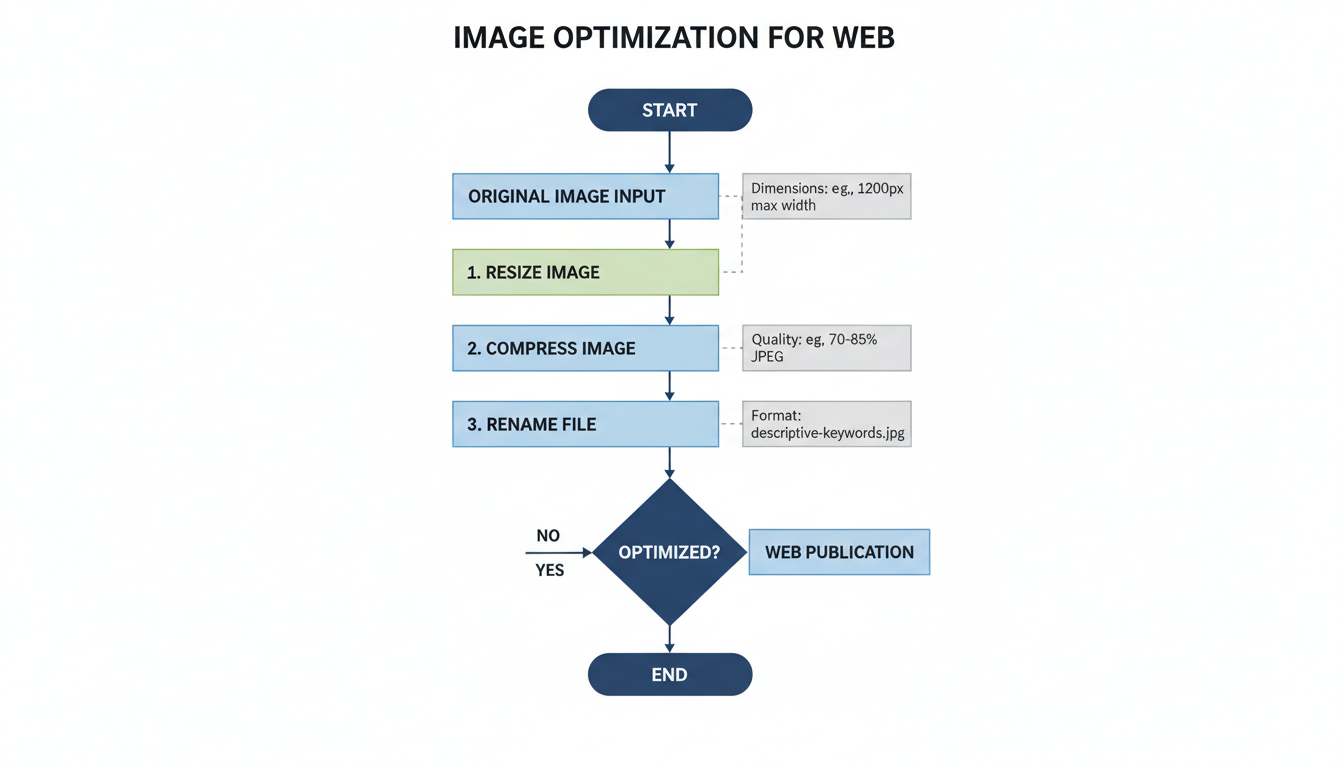
Using an image resizer is straightforward, but having a standardized process prevents mistakes. Here is the exact workflow my team uses to prepare images for publication. (By the way, if you’re optimizing your whole post, don’t forget to pair your optimized images with a clean URL using an SEO friendly URL slug generator).
- Identify Your Maximum Display Width: Find out the maximum width of your website’s content container. For most WordPress blogs, this is between 800px and 1200px. There is zero reason to upload an image wider than this number.
- Upload to Your Image Resizer: Select your high-resolution source file and drop it into your chosen tool.
- Lock the Aspect Ratio: This is critical. Ensure the “Maintain Aspect Ratio” (often a chainlink icon) is checked. If you change the width without locking the ratio, your image will look stretched and distorted.
- Input the New Dimensions: Type in your target width (e.g., 1200px). The tool will automatically calculate the correct height.
- Select Format and Compress: Choose WebP or JPEG. Set the quality slider to around 75-80%. This is the sweet spot where the human eye can’t detect quality loss, but the file size drops dramatically.
- Rename for SEO: Never upload a file named
IMG_9942.jpg. Rename it to describe the image using hyphens, likeblue-running-shoes-side-view.jpg.
Common Image Optimization Mistakes
Even seasoned webmasters mess this up occasionally. Here are the pitfalls you need to avoid when processing your media.
⚠️ Watch Out: The Over-Compression Trap
While small file sizes are great for SEO, over-compressing your images until they look blurry or pixelated destroys your brand’s credibility. If your product photos look like they were taken with a potato, users won’t buy. Always preview the image at 100% scale before uploading.
Another frequent error is ignoring thumbnail optimization for video content. If your content strategy involves embedded video, ensuring your custom thumbnails are the correct size is vital. While you might use tools for optimizing content for YouTube, if the thumbnail image itself is a 4MB file, it will still drag down your page speed.
⚠️ Watch Out: Relying Solely on CSS Resizing
Uploading a 4000px wide image and using HTML/CSS to display it at 400px wide is a massive mistake. The browser still has to download the entire 4000px file before shrinking it visually. Always resize the actual source file first.
Let’s look at a quick comparison of what happens when you do this right versus when you do it wrong.
| Metric | Unoptimized Image (Raw) | Optimized Image (Resized) |
|---|---|---|
| Dimensions | 4500 x 3000 px | 1200 x 800 px |
| File Size | 4.2 MB | 85 KB |
| Load Time (3G) | 12.5 seconds | 0.4 seconds |
| Browser Action | Downloads full file, scales via CSS | Downloads exact size needed instantly |
💡 Pro Tip
If you have an existing site with thousands of unoptimized images, don’t panic. You don’t have to resize them manually. Use a bulk image optimization plugin (like ShortPixel or Smush for WordPress) to retroactively resize and compress your entire media library in the background.
Conclusion
Here’s the bottom line: using an image resizer is a strategic necessity for anyone serious about their online presence. From boosting page load speeds and dominating Core Web Vitals to saving server bandwidth and keeping users engaged, the benefits are impossible to ignore.
Don’t let heavy, unoptimized images drag your digital performance into the mud. Start resizing your visuals today. Find out your site’s maximum content width, build a resizing step into your publishing workflow, and switch to modern formats like WebP. In the highly competitive world of SEO, every single millisecond counts. Optimizing your images is the absolute easiest win you can get for massive speed improvements.
Frequently Asked Questions
Does using an image resizer ruin image quality?
Not if you do it correctly. Resizing reduces the physical pixel dimensions, which naturally removes data, but smart compression algorithms maintain visual clarity. You will only see quality degradation if you over-compress the file (saving at less than 60% quality) or try to enlarge a small image.
What is the best image size for a blog post?
While there isn’t a universal answer, a width of 1200px is the industry standard for blog content. This is wide enough to look crisp on high-resolution retina displays, but small enough to keep file sizes manageable. Always aim to keep your final file size under 150KB.
What is the difference between resizing and compressing?
Resizing changes the actual physical dimensions of the image (e.g., changing the width from 3000 pixels to 1000 pixels). Compressing keeps those dimensions exactly the same but encodes the digital data more efficiently to reduce the file size (KB). For the best SEO results, you must do both.
Can I just use CSS to make my images look smaller?
No, this is a terrible practice for SEO. If you use CSS to shrink a 5MB image down to a thumbnail, the user’s browser still has to download the entire 5MB file. You must resize the actual source file using an image resizer before uploading it to your server.
Should I use an image resizer for social media photos?
Yes. Social media platforms like Instagram, X, and Facebook compress uploaded images automatically, and their algorithms are often very aggressive, resulting in blurry photos. By resizing your images to their exact recommended dimensions beforehand, you maintain total control over the final visual quality.

