
Imagine this scenario: You are managing a retrofit for a mid-sized chemical plant. You’ve ordered high-grade epoxy coating based on a rough “rule of thumb” estimate. Three weeks into the project, the crew runs dry. Work stops. Rush fees kick in. The client is furious.
I’ve seen this happen more times than I care to count. In the industrial world, precision isn’t just a nice-to-have; it is the difference between a profitable quarter and a logistical nightmare.
Whether you are an estimator calculating paint coverage, a thermal engineer designing insulation lagging, or a project manager trying to minimize waste, the math matters. A pipe surface area calculator is your first line of defense against budget bloat. But simply plugging numbers into a web tool isn’t enough. You need to understand the variables, the “invisible” surface areas of fittings, and how to apply these numbers to real-world procurement.
In this 2026 guide, we are ditching the textbook theory. We are going to look at how to use surface area calculations to drive efficiency, cut costs, and nail your estimates every single time.
📑 What You’ll Learn
The High Cost of Calculation Errors
Let’s be honest. Nobody gets excited about geometry. But everyone cares about money. When you are dealing with hundreds of meters of piping, a fractional error in diameter measurement or a misunderstanding of “nominal bore” vs. “actual outer diameter” scales up terrifyingly fast.
In my experience consulting on industrial refits, material wastage usually stems from one of two things: over-ordering “just to be safe” (which kills margins) or under-ordering (which kills timelines). Using a precise pipe surface area calculator methodology allows you to move from “guesstimating” to engineering.
🎯 Key Takeaway
Surface area calculation is not just about geometry; it is a procurement strategy. Accurate data prevents the “10% contingency trap,” allowing you to bid more competitively by reducing the buffer you build in for errors.
Deconstructing the Formula: It’s Just a Rectangle
To trust the tool, you have to understand the mechanics. Geometrically, a pipe is a cylinder. If you were to slice that cylinder down the middle and unroll it flat, you would end up with a simple rectangle.
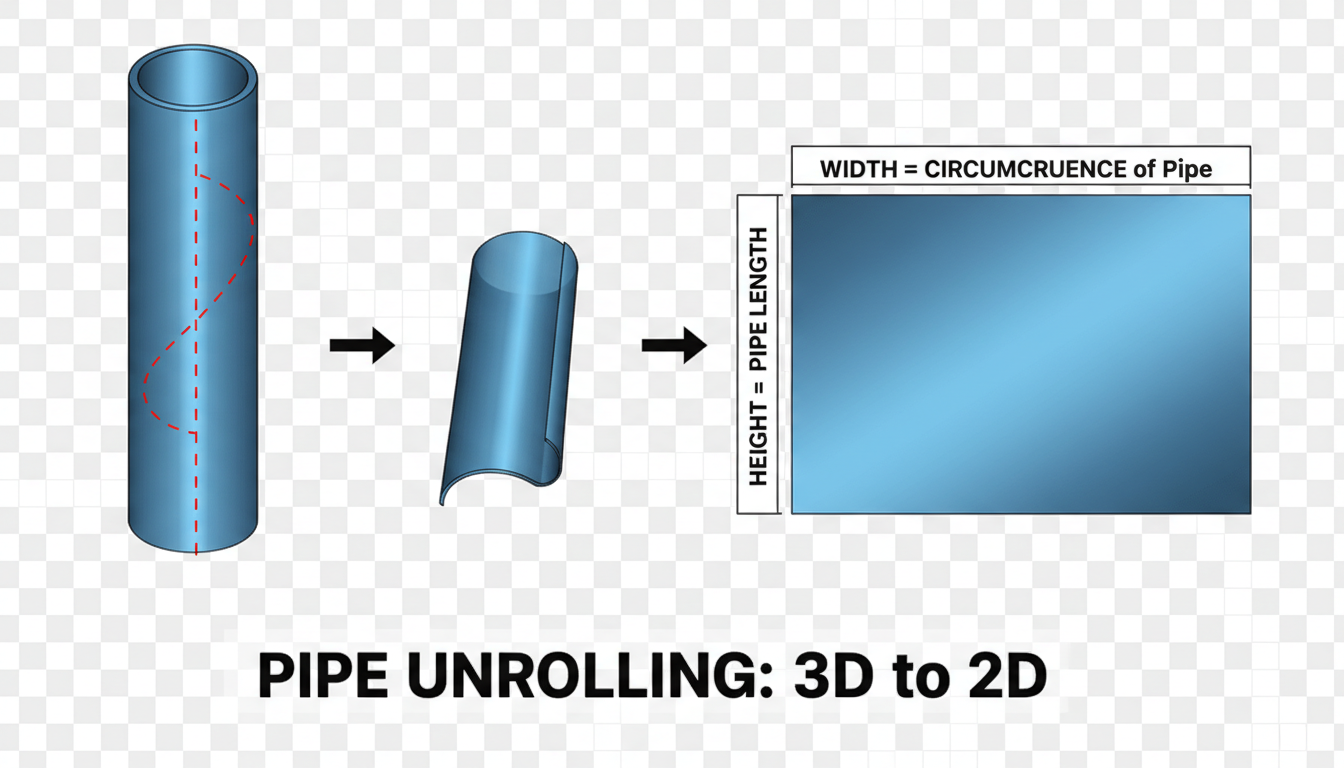
The formula used by every pipe surface area calculator is derived from this concept:
Surface Area = Circumference × Length
Since Circumference = $pi times d$ (where $d$ is diameter), the working formula is:
$Area = pi times d times L$
The Critical Distinction: ID vs. OD
Here is where 90% of rookies mess up. They grab the spec sheet, see “6-inch pipe,” and plug 6 inches into the calculator. Don’t do this.
- Nominal Pipe Size (NPS): A vague label. A “6-inch” pipe actually has an Outer Diameter (OD) of 6.625 inches.
- Outer Diameter (OD): Use this for painting, external coating, and insulation.
- Inner Diameter (ID): Use this for flow rate, internal volume, and internal lining.
⚠️ Watch Out
Never use the Nominal Pipe Size (NPS) for surface area calculations. A 2-inch Schedule 40 pipe has an OD of 2.375 inches. If you calculate based on 2 inches, you will under-estimate your material needs by nearly 20%.
Step-by-Step: Calculating Like a Pro
Ready to get the numbers right? Follow this workflow to ensure your data is audit-ready.
- Identify the Pipe Schedule: Check the engineering drawings. Is it Schedule 40? Schedule 80? This determines the wall thickness and, consequently, the ID (though OD usually remains constant for a given NPS).
- Determine the Goal: Are you coating the outside or lining the inside?
- External: Measure or look up the actual OD.
- Internal: Calculate ID = OD – (2 × Wall Thickness).
- Measure the Run: Get the total linear length. Group pipes by diameter. Do not mix a 4-inch run with a 6-inch run in the same calculation.
- Standardize Units: This is crucial. If your diameter is in inches and length is in feet, convert everything to decimal feet before multiplying. Or, use a calculator that handles the conversion for you.
- Apply the Formula: Multiply $pi$ (3.1416) × Diameter × Length.
For authoritative data on pipe dimensions and schedules, I always recommend cross-referencing with the Engineering ToolBox before finalizing any material orders.
Real-World Applications: Paint & Insulation
The math is the easy part. The application is where it gets tricky. Different trades use the surface area data differently.
Scenario A: Industrial Painting
When estimating paint, you aren’t just covering the steel. You are dealing with transfer efficiency and surface profile. A pipe surface area calculator gives you the theoretical square footage. You must then adjust for the “Loss Factor.”
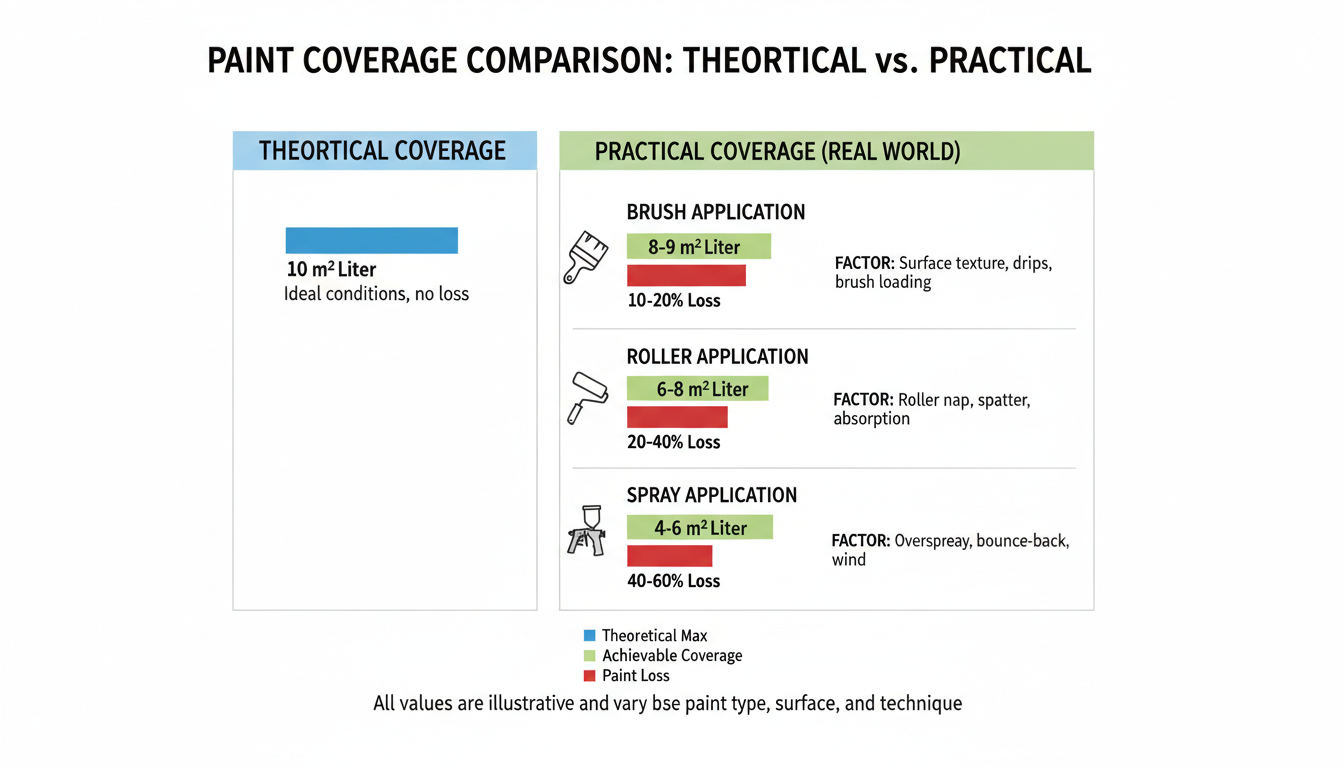
💡 Pro Tip
The “Small Pipe” Penalty: Painting small diameter pipes (under 2 inches) results in massive overspray if you are using a spray gun. Experienced estimators often double the calculated surface area for pipes under 2 inches to account for paint that misses the target.
Scenario B: Thermal Insulation
Insulation is unique because the surface area changes as you add layers. If you are putting 2 inches of calcium silicate on a 6-inch pipe, the surface area of the insulation jacket (the outer metal cladding) is significantly larger than the pipe itself.
You need to calculate the surface area based on the new diameter:
New Diameter = Pipe OD + (2 × Insulation Thickness).
According to the U.S. Department of Energy, uninsulated steam distribution lines are a primary source of energy waste in manufacturing facilities. Accurate surface area calculation is the first step in the ROI analysis for insulation retrofits.
Comparison: Paint vs. Insulation Estimation
| Feature | Painting Estimation | Insulation Estimation |
|---|---|---|
| Primary Metric | Square Meters / Sq Feet of Metal | Linear Meters (converted to volume) |
| Diameter Used | Pipe Outer Diameter (OD) | Pipe OD + Insulation Thickness |
| Wastage Factor | High (Overspray, wind loss) | Low (Cut-offs, fitting adjustments) |
| Critical Variable | Dry Film Thickness (DFT) | Thermal Conductivity (K-value) |
The “Invisible” Area: Fittings and Flanges
Here is the thing about a standard pipe surface area calculator: it assumes a straight line. But piping systems are full of elbows, tees, valves, and flanges. If you ignore these, you will come up short.
A 6-inch valve has a much larger surface area than a 6-inch straight pipe of the same length. It has a body, a bonnet, flanges, and bolts. Painting a valve can take 3x the material and 5x the labor of a straight run.
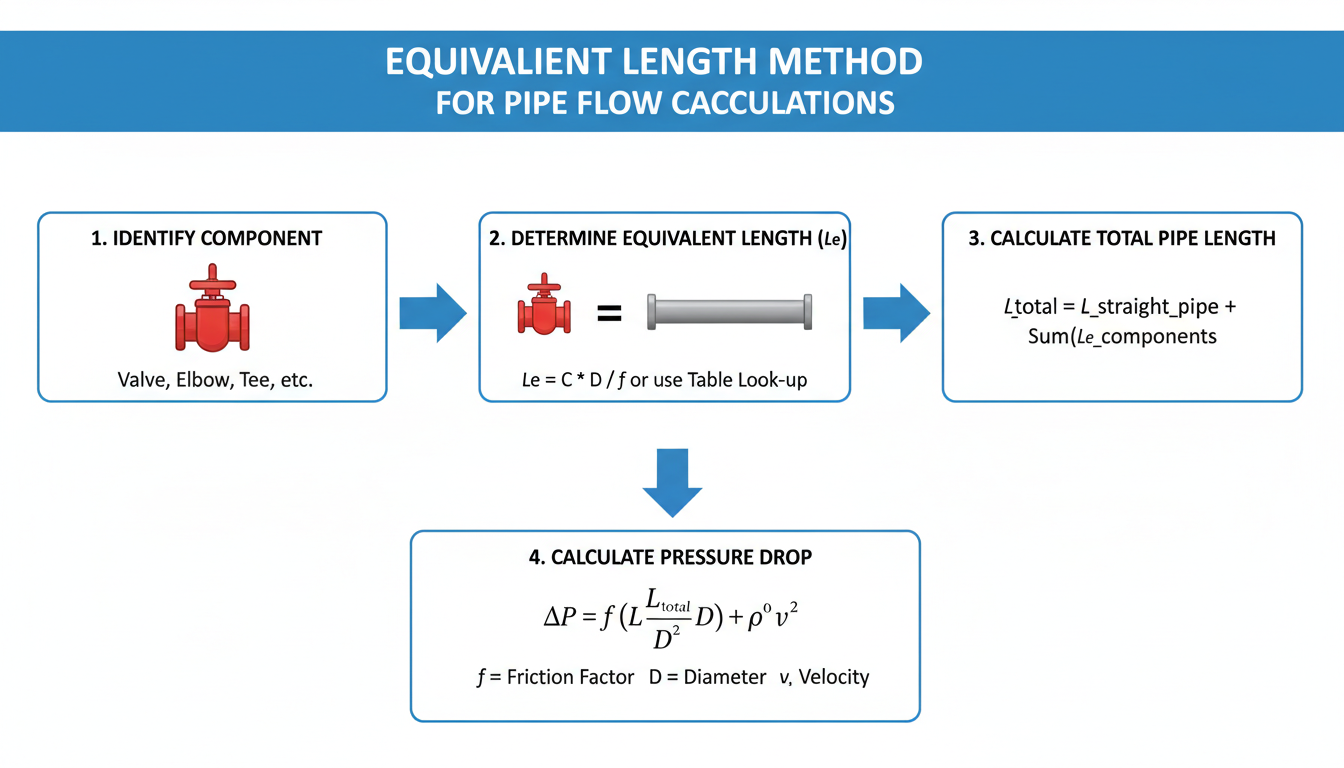
How to Handle Fittings
You have two options here:
- The Detailed Method: Calculate each fitting individually using manufacturer surface area tables. (Accurate, but slow).
- The Equivalent Length Method: Treat each fitting as a specific length of straight pipe. For example, count every flanged valve as 3 meters of straight pipe for estimation purposes.
⚠️ Watch Out
Corrugated Pipes: If you are dealing with corrugated drainage pipes or flexible hoses, the standard formula fails. The ridges increase the actual surface area by 30% to 50%. Always check the manufacturer’s spec sheet for the “developed surface area” factor.
❓ Frequently Asked Questions
Does a pipe surface area calculator account for wall thickness?
Generally, no. Most calculators ask for the diameter. If you input the Outer Diameter (OD), wall thickness is irrelevant for the external surface area. However, if you need the internal surface area, you must subtract (2 x wall thickness) from the OD to get the correct Inner Diameter (ID).
How do I calculate the surface area of a square tube?
You cannot use the Pi formula for square tubing. Instead, calculate the perimeter (Side 1 + Side 2 + Side 3 + Side 4) and multiply it by the length. For a square tube, it is simply: 4 × Side Width × Length.
What percentage should I add for waste?
For painting straight pipes, a standard safety factor is 10-15%. For complex piping with many valves and fittings, bump that to 20-30%. For insulation, waste is typically lower, around 5-10%, as cut-offs can often be reused.
Why is my manual calculation different from the online calculator?
This is usually a unit conversion issue. If you multiply inches by feet without converting, your result will be meaningless. Ensure all units are identical (e.g., convert pipe diameter to feet) before multiplying. Also, check if the calculator is using the precise value of Pi or a rounded version (3.14).
Conclusion: Measure Twice, Order Once
In 2026, with material costs fluctuating and project timelines tighter than ever, there is no room for “back of the napkin” math. A pipe surface area calculator is a powerful asset, but only if you feed it the right data.
Remember the golden rules: Always use the actual Outer Diameter, not the nominal size. Account for the extra surface area created by insulation thickness. And never forget the “invisible” costs hidden in valves and fittings.
By standardizing your calculation workflow, you don’t just save time—you protect your profit margins. For further reading on industrial standards and piping codes, the American Society of Mechanical Engineers (ASME) provides the definitive guidelines used globally.
Now, go grab those specs, check your ODs, and get your estimates right the first time.

