Here’s a brutal truth about the web: nobody waits for your website to load. In fact, Google’s data suggests that if your site takes longer than three seconds to load, over half of your visitors are gone before they even see your headline. It’s a silent revenue killer.
I’ve audited hundreds of websites in my career, from small blogs to massive e-commerce platforms. The number one culprit for sluggish performance? Unoptimized images. It’s almost always the images. You might have the cleanest code in the world, but if you’re serving a 4MB hero image to a mobile user on a 4G connection, you’re tanking your user experience—and your SEO rankings along with it.
This isn’t just about “making files smaller.” It’s about the strategic balance between visual fidelity and performance engineering. In this guide, we’re going to strip away the jargon and look at image compression through the lens of a modern content strategist. We’ll cover the exact workflows used by pros to slash file sizes by up to 80% without the naked eye ever noticing a difference.
📑 What You’ll Learn
The Science: How Compression Actually Works
To master image compression, you need to understand what’s happening under the hood. It’s not magic; it’s math. When a camera takes a photo, it captures an immense amount of data—millions of colors, subtle lighting shifts, and metadata. For a print magazine, you need all that data. For a smartphone screen? Not so much.
Compression algorithms work by identifying patterns. If an image has a large patch of blue sky, the raw file stores the color value for every single pixel. A compression algorithm says, “Hey, these 500 pixels are all roughly the same blue. Let’s just write a code that says ‘500 blue pixels here’ instead of listing them individually.”
There are two main players in this game: Lossy and Lossless. Choosing the wrong one is the most common mistake I see beginners make.
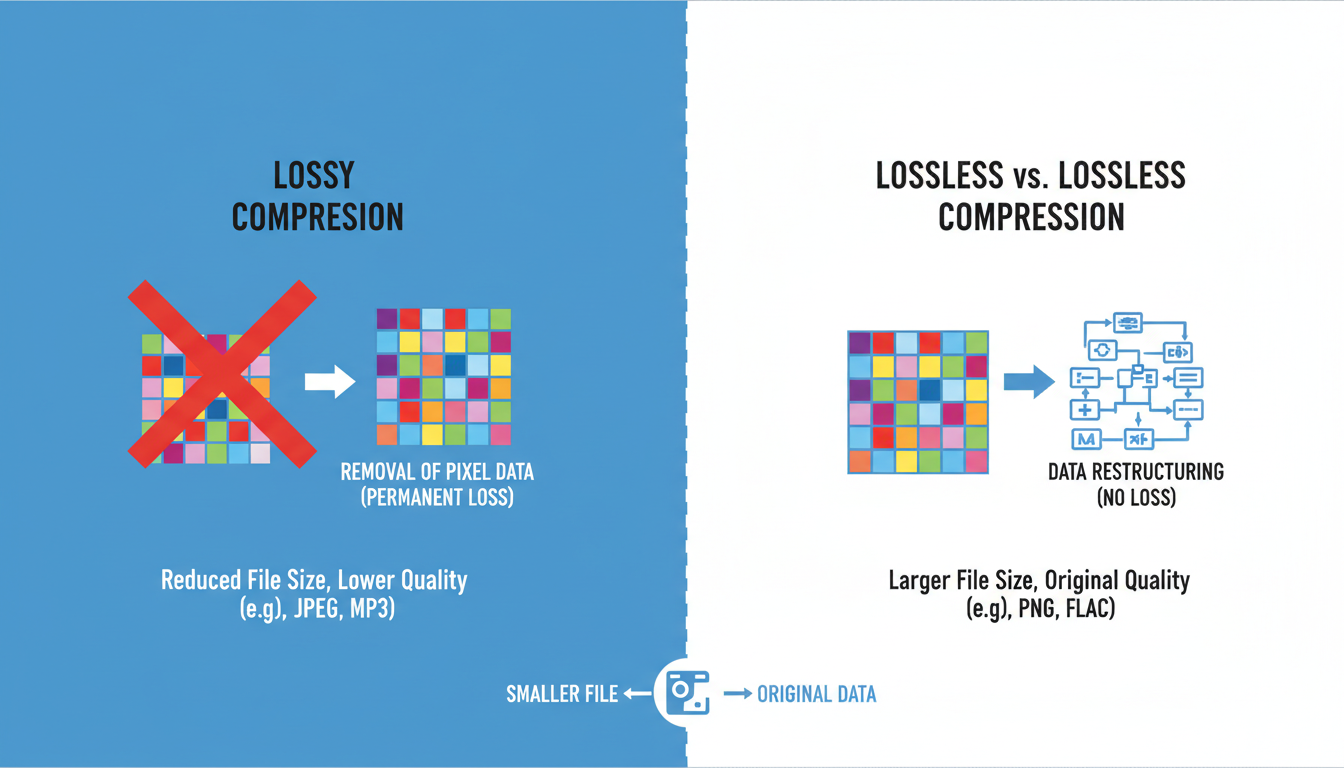
| Feature | Lossy Compression | Lossless Compression |
|---|---|---|
| How it works | Permanently deletes “non-essential” data. | Compresses data without deleting anything (like a ZIP file). |
| File Size Reduction | Massive (often 70-90% reduction). | Moderate (usually 5-20% reduction). |
| Visual Quality | Can degrade if pushed too far (artifacts/blur). | Identical to the original. 100% quality retention. |
| Best Use Case | Web photographs, blog posts, hero banners. | Logos, icons, technical drawings, transparent backgrounds. |
💡 Pro Tip
Don’t be afraid of Lossy compression. The human eye is remarkably forgiving. In our testing, a JPEG compressed at 80% quality is virtually indistinguishable from the original raw file when viewed on a standard web browser, yet the file size is often 10x smaller.
Why Google Cares (And You Should Too)
Let’s talk about Google. They don’t care how pretty your site is; they care how fast it serves answers to their users. Since the introduction of Core Web Vitals, image compression has moved from a “nice-to-have” to a “critical ranking factor.”
Specifically, we are looking at a metric called Largest Contentful Paint (LCP). This measures how long it takes for the main content of your page (usually a big image or headline) to load. If your hero image is 3MB, your LCP will be slow. If your LCP is slow, Google effectively downranks your page because you’re providing a poor user experience.
It’s a chain reaction:
- Uncompressed images delay page rendering.
- Users get frustrated and hit the “Back” button (Bounce Rate spikes).
- Google sees the high bounce rate and assumes your content isn’t relevant.
- Your rankings drop.
By simply running your assets through a compression tool, you are directly signaling to search engines that your site is healthy, fast, and user-friendly.
Format Wars: JPEG vs. PNG vs. WebP vs. AVIF
Not all file formats are created equal. While we used to rely strictly on JPEGs and PNGs, the landscape has shifted. Modern formats like WebP and AVIF are game-changers. They offer better quality at significantly smaller file sizes.
Here is the breakdown of when to use what:
| Format | Best For | Pros | Cons |
|---|---|---|---|
| JPEG (JPG) | Standard photos, e-commerce products. | Universally supported, good color range. | No transparency, artifacts appear at high compression. |
| PNG | Logos, screenshots, graphics with text. | Supports transparency, crisp lines. | File sizes get HUGE quickly for photos. |
| WebP | The Web Standard. Use for almost everything. | 25-35% smaller than JPEG/PNG for same quality. | Supported by all modern browsers (97%+ coverage). |
| AVIF | Next-gen optimization. | Even smaller than WebP with better HDR support. | Slightly less browser support than WebP (but growing). |
⚠️ Watch Out
Never save a photograph as a PNG unless you absolutely need a transparent background. I recently saw a client’s homepage taking 8 seconds to load because they saved a photo of their team as a PNG. It was 4.5MB. Converting it to a WebP reduced it to 120KB instantly.
7 Essential Steps to Master Image Compression
Ready to fix your site? Don’t just blindly upload files. Follow this workflow to ensure every pixel earns its place on your page.
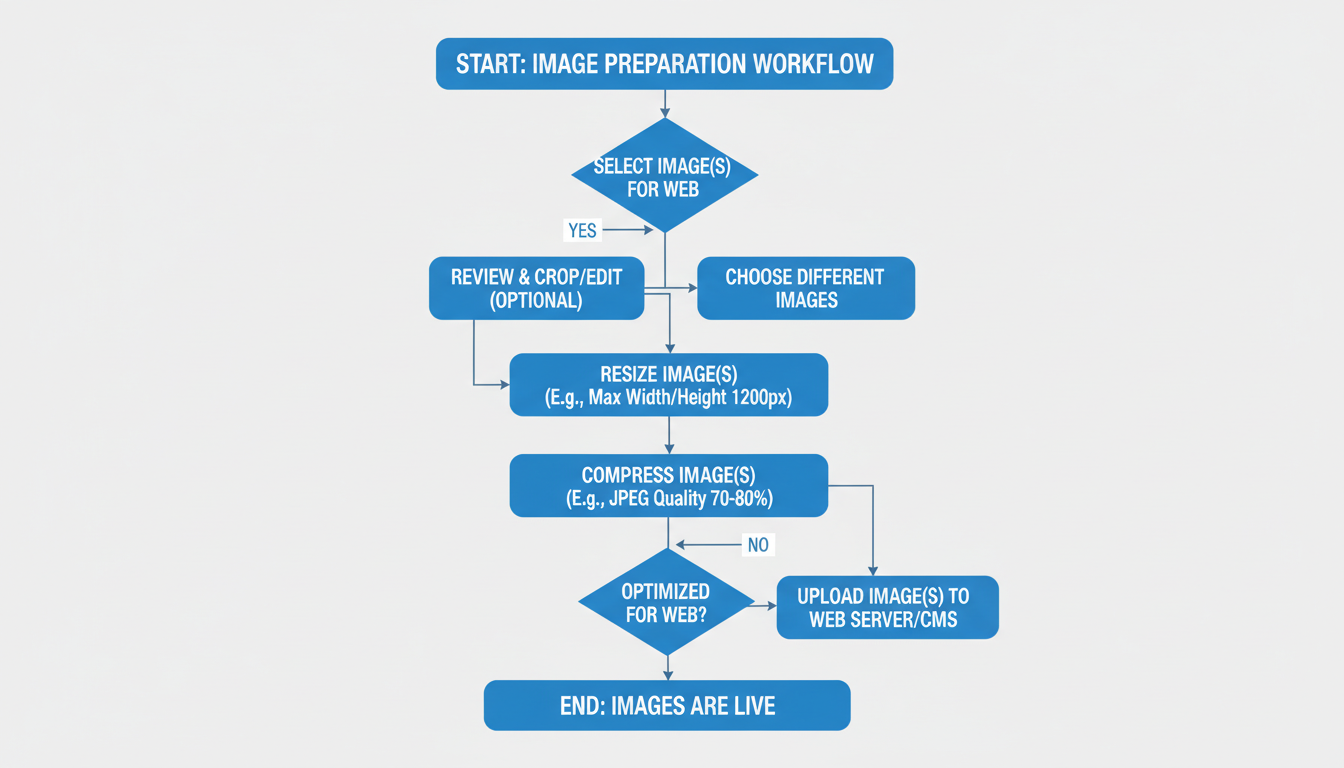
Step 1: The Audit
You can’t fix what you don’t measure. Run your site through Google PageSpeed Insights. Look specifically for the warning “Properly size images” or “Serve images in next-gen formats.” This will give you a hit list of the worst offenders.
Step 2: Resize to Physical Dimensions
This is the step most people skip. If your blog content area is only 800 pixels wide, why are you uploading a 4000-pixel wide image from your DSLR? You are forcing the user’s browser to download a massive file and then shrink it down visually.
Rule of thumb: Resize your image to the maximum width it will ever be displayed. If your site layout maxes out at 1200px, resize your image to 1200px before you compress it.
Step 3: Choose the Right Format
Refer to the table above. If it’s a photo, aim for WebP. If you need a transparent logo, PNG (or SVG for vectors) is your friend. If you are creating visuals using AI tools, like those found in tutorials on how to generate AI images, be aware that the raw output is often massive. Always convert these before publishing.
Step 4: The Compression Phase
Now, apply the compression. You have three options:
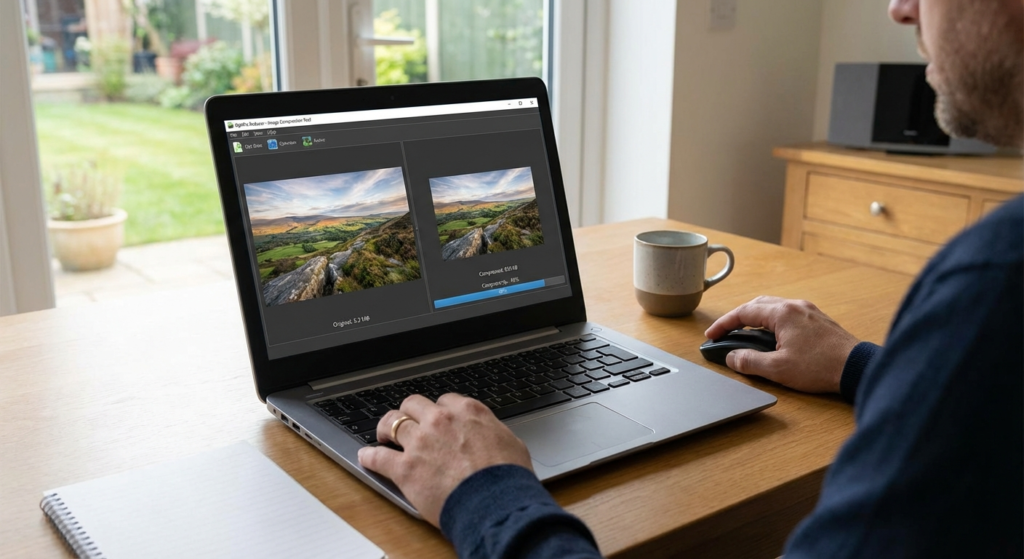
- Online Tools: Sites like TinyPNG or Squoosh.app are fantastic for one-off images. Squoosh allows you to see a real-time slider of quality vs. size.
- Desktop Software: Photoshop or Lightroom. Use the “Export for Web” legacy feature or modern export settings to control the quality percentage.
- CLI Tools: For developers, tools like ImageMagick can batch process thousands of images in seconds.
Step 5: Analyze the Artifacts
Look closely at the preview. Do you see “banding” in the sky? Is the text on the sign blurry? If so, back off the compression slightly. We want the file as small as possible without looking cheap.
Step 6: Update Metadata (SEO Boost)
Before uploading, rename your file. DSC_0091.jpg tells Google nothing. best-image-compression-tools.jpg tells Google exactly what the image is. Once uploaded, always add your Alt Text. This is crucial for accessibility and helps search engines understand the context of the visual.
Step 7: Re-Test
After replacing the images, run PageSpeed Insights again. You should see a dramatic improvement in your LCP score and overall performance grade.
🎯 Key Takeaway
The goal of image compression isn’t just “smaller files.” It is to find the “Sweet Spot”—the lowest possible file size that maintains acceptable visual quality. For most web use cases, a JPEG or WebP at 80% quality is the gold standard, offering significant savings with zero visible degradation.
Advanced Tips: Automating the Workflow
If you are managing a WordPress site with multiple authors, you can’t rely on everyone to manually compress images in Photoshop. Humans forget. Systems don’t.
I highly recommend installing an image optimization plugin. These tools sit on your server and automatically compress every image the moment it is uploaded. They can also create WebP versions on the fly.
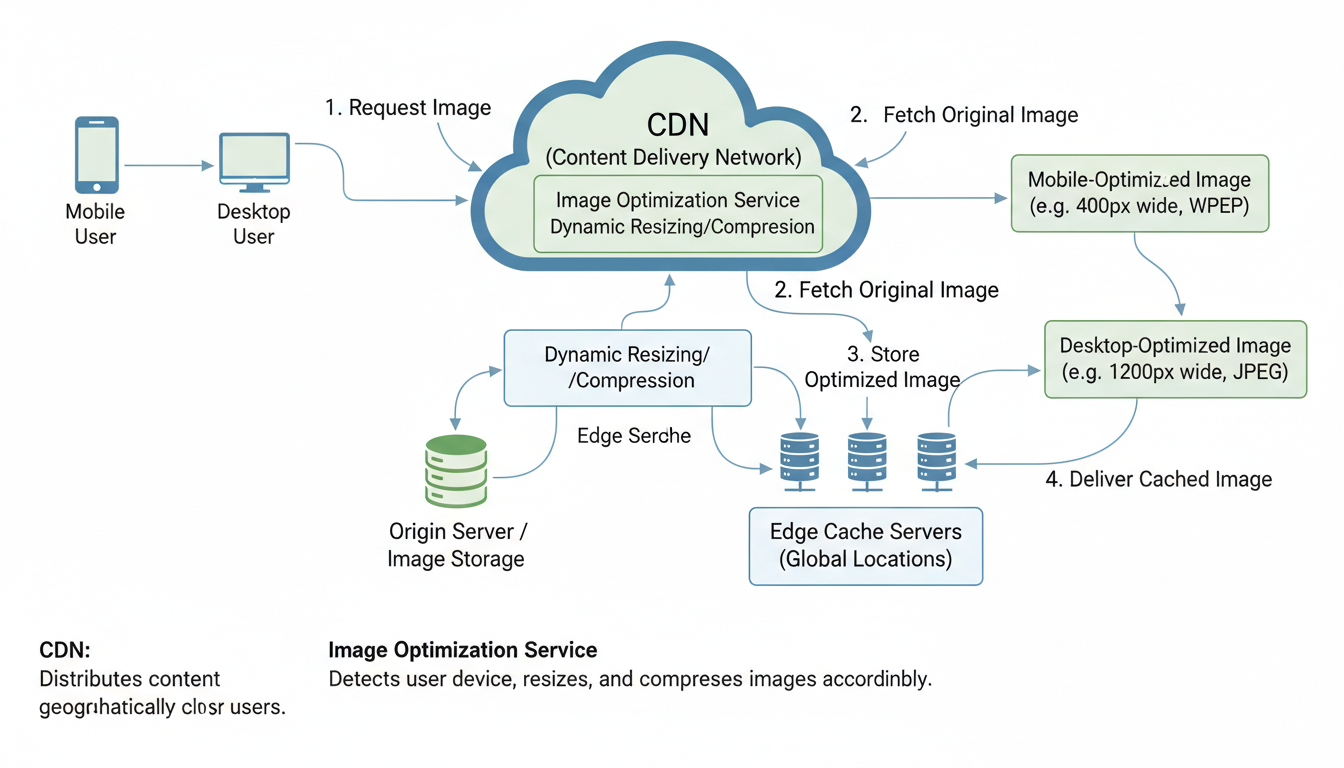
Furthermore, consider using a Content Delivery Network (CDN). A good CDN doesn’t just host your images; it optimizes them based on the user’s device. It can detect if a user is on an iPhone and serve a smaller, perfectly sized version of the image, while serving a larger version to a user on a 27-inch iMac. It’s like having a personal concierge for your data.
Think of it like budgeting. Just as you might use a tool to calculate the percentage of savings during a sale, you should be calculating the bandwidth savings on your server. Reducing your average page size from 3MB to 1MB cuts your bandwidth costs by 66%—that’s real money back in your pocket.
⚠️ Watch Out
Avoid “Double Compression.” If you compress an image in Photoshop, and then your WordPress plugin compresses it again, and then your CDN compresses it a third time, you’re going to end up with a blurry mess. Choose one point in your workflow to handle the heavy lifting.
Conclusion
In the digital ecosystem, speed is the currency of trust. An unoptimized image is a barrier between you and your audience. By mastering image compression, you aren’t just making files smaller; you are respecting your user’s time and data plan.
Start small. Audit your top 10 most popular pages today. Resize the images, convert them to WebP, and compress them. The difference in load speed will be instant, and the improvement in your analytics won’t be far behind. The tools are free, the process is simple, and the payoff is massive. You have no excuse to run a slow website anymore.
❓ Frequently Asked Questions
What is the ideal file size for a web image?
While it varies by complexity, a good target is to keep large hero images under 200KB and standard blog images under 100KB. If you can get them under 50KB without losing quality, even better.
Does changing the file extension from .png to .jpg compress the image?
Simply renaming the file does nothing and can actually break the image. You must use image editing software or an online converter to actually re-encode the image data into the new format.
Is WebP really better than JPEG?
In almost every web scenario, yes. Google developed WebP specifically for the web. It supports both lossy and lossless compression and typically produces files that are 25-35% smaller than a comparable JPEG.
Will compression remove my EXIF data?
Most compression tools designed for the web will strip EXIF data (camera settings, GPS location, etc.) to save space. This is generally a good thing for privacy and file size. If you run a photography portfolio and need that data, check your tool’s settings to preserve metadata.
How do I check if my images are slowing down my site?
Use Google PageSpeed Insights or GTmetrix. These tools will scan your page and provide a specific list of images that are too large or unoptimized, often showing you exactly how much time you could save by compressing them.

