Ever been there? It’s 11 PM, you’re about to submit a crucial document, and the instructions read: “Please upload a signed and scanned copy.” Your document is a pristine, digitally-born PDF. Your signature is digital. You haven’t seen a physical scanner in years. Panic sets in.
Don’t worry. This isn’t a dead end. It’s a common hurdle in a world caught between digital efficiency and old-school bureaucracy.
The truth is, you don’t need a clunky scanner to get that “scanned” look. You just need the right techniques. In this guide, I’m pulling back the curtain on the exact methods professionals use. We’ll go from quick online fixes to the pixel-perfect control of Adobe Photoshop. You’ll learn not just how to do it, but why certain details matter, ensuring your document looks authentic every single time.
📑 What You’ll Learn
- Why (and When) to Make a PDF Look Scanned
- The Anatomy of a Realistic “Scanned” Document
- Choosing Your Method: A Quick Comparison
- Method 1: The 60-Second Fix with Online Tools
- Method 2: Ultimate Realism with Adobe Photoshop
- Method 3: The Free Pro-Level Alternative (GIMP)
- Method 4: The Power-User’s Workflow in Adobe Acrobat Pro
- Frequently Asked Questions
Why (and When) to Make a PDF Look Scanned
Let’s get one thing straight: this isn’t about deception. It’s about presentation and compliance. In our experience managing thousands of digital documents, the need to make a PDF look scanned pops up for a few legitimate reasons:
- Perceived Authenticity: Some institutions, especially in legal, academic, or government sectors, associate a “scanned” look with a document that was physically handled and signed. It provides a psychological link to a real-world process, even if it’s just for show.
- Document Consistency: Picture this: you’re compiling a report. Half of it is new content you created, but the other half consists of genuinely scanned appendices. A jarring mix of crisp digital pages and grainy scanned ones looks unprofessional. Making all pages match creates a seamless, cohesive final document.
- Meeting Outdated Requirements: It’s 2026, but some organizations still operate on 2006-era logic. Their submission portals or internal policies might implicitly (or explicitly) expect a document that appears to have passed through a physical machine. It’s about fitting the format they expect.
- Aesthetic Choice: In creative fields, a clean vector PDF can feel sterile. Designers and artists sometimes use a scanned, grainy texture as a deliberate stylistic choice to add a retro, analog, or “z-ne” feel to their work.
⚠️ Watch Out
The line between presentation and misrepresentation is critical. While making a document look scanned for formatting is fine, using these techniques to forge signatures, alter dates, or fraudulently change contract terms is illegal and unethical. Always act with integrity.
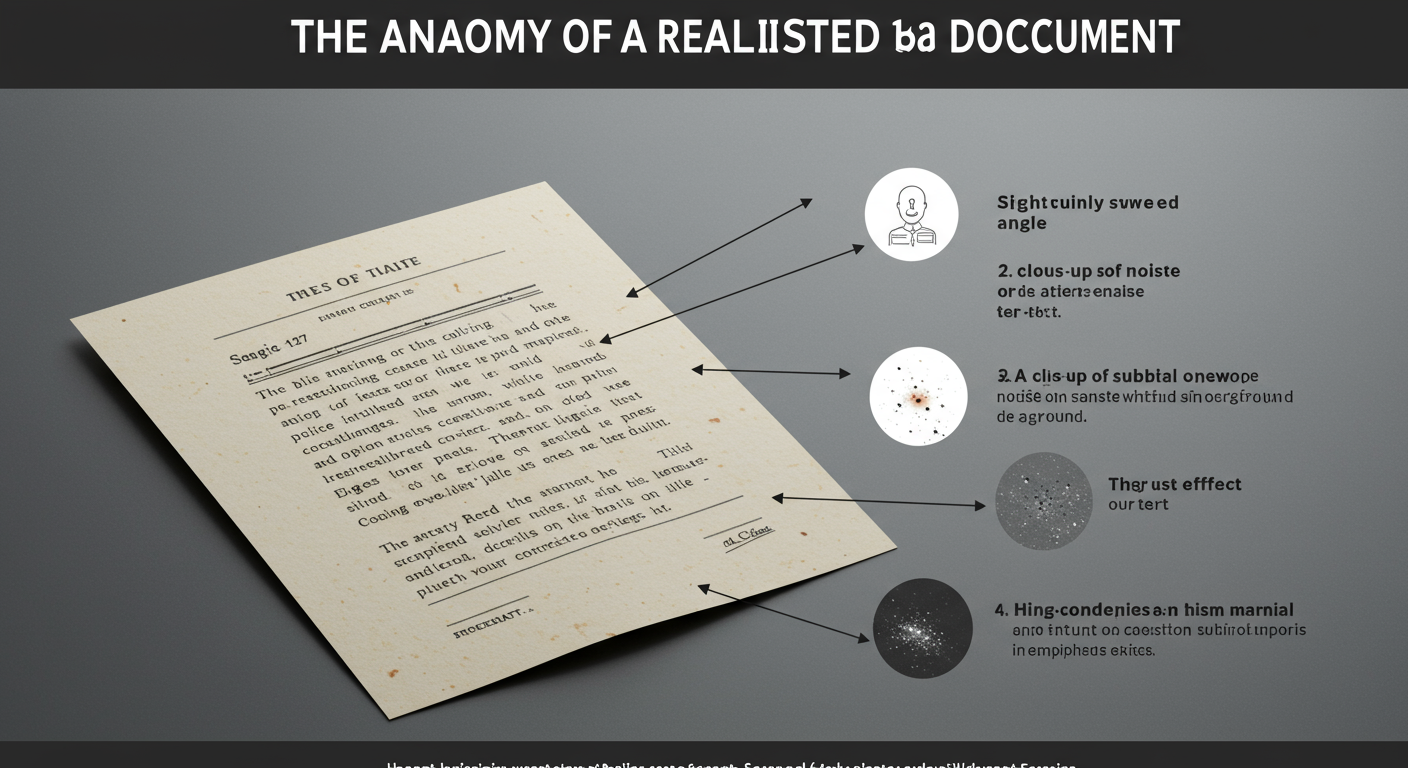
The Anatomy of a Realistic “Scanned” Document
To fake a scan, you have to think like a scanner. A scanner is an imperfect machine. It introduces tiny flaws—flaws that a perfectly rendered digital PDF lacks. Replicating these subtle imperfections is the secret sauce. Get these right, and your document will be indistinguishable from the real thing.
Here are the four core elements you need to master:
- The Imperfect Angle (Skew): No one places a paper perfectly on a scanner. A tiny, almost imperceptible rotation of 0.3 to 0.8 degrees is the number one sign of an authentic scan. Any more, and it looks sloppy. Any less, and it’s too perfect.
- The Sensor’s Footprint (Noise/Grain): A scanner’s optical sensor (CCD or CIS) isn’t flawless. It introduces a fine layer of digital noise. Adding a subtle, monochromatic noise filter breaks up the unnaturally smooth color blocks of a digital document.
- The High-Contrast Look (Levels): Scanners often blow out the highlights and crush the blacks. They don’t capture a perfect tonal range. By adjusting the “Levels” or “Curves,” you can mimic this high-contrast effect, making whites brighter and text darker. This is especially true for black-and-white scans.
- The Real-World Grime (Imperfections): A pristine scanner bed is a myth. A few tiny, randomly placed specks (simulating dust) or a faint, low-opacity vertical line (simulating a scratch on the glass) can add a powerful layer of realism. The key word here is subtle.
Choosing Your Method: A Quick Comparison
Not all methods are created equal. Your choice depends on your needs: speed, control, cost, and security. Based on our hands-on testing, here’s a breakdown of the best options.
| Method | Cost | Speed | Control & Realism | Best For… |
|---|---|---|---|---|
| Online Tools | Free | ⚡️ Fastest | Low | Quick, non-sensitive documents where “good enough” is fine. |
| Adobe Photoshop | Subscription | Medium | 👑 Highest | Professionals who need maximum realism and control over every detail. |
| GIMP | Free | Medium | High | Users who want Photoshop-level control without the cost. |
| Adobe Acrobat Pro | Subscription | Fast | Medium | Power users who want to stay within the PDF ecosystem for batch processing. |
Method 1: The 60-Second Fix with Online Tools
For when you needed that scanned document yesterday, online simulators are your best friend. These web-based tools are designed for one job: upload a PDF, apply a filter, and download the result.
How it works:
- Search for “make PDF look scanned online” or “PDF scan effect generator.”
- Choose a tool. Critically, read their privacy policy.
- Upload your PDF file.
- Adjust the simple sliders, usually for “scan quality,” “rotation,” or “black & white.”
- Process and download your new “scanned” PDF.
⚠️ Watch Out
Never, ever upload sensitive or confidential documents to a free online tool. You have no real control over what happens to your data. For contracts, financial records, or personal information, use an offline method like Photoshop or GIMP.
Method 2: Ultimate Realism with Adobe Photoshop
When every detail matters, nothing beats Photoshop. This is the method for perfectionists. It gives you granular control over every element of the scanned look. It takes a few more minutes, but the results are flawless.
Step-by-Step Guide to a Perfect Scan in Photoshop
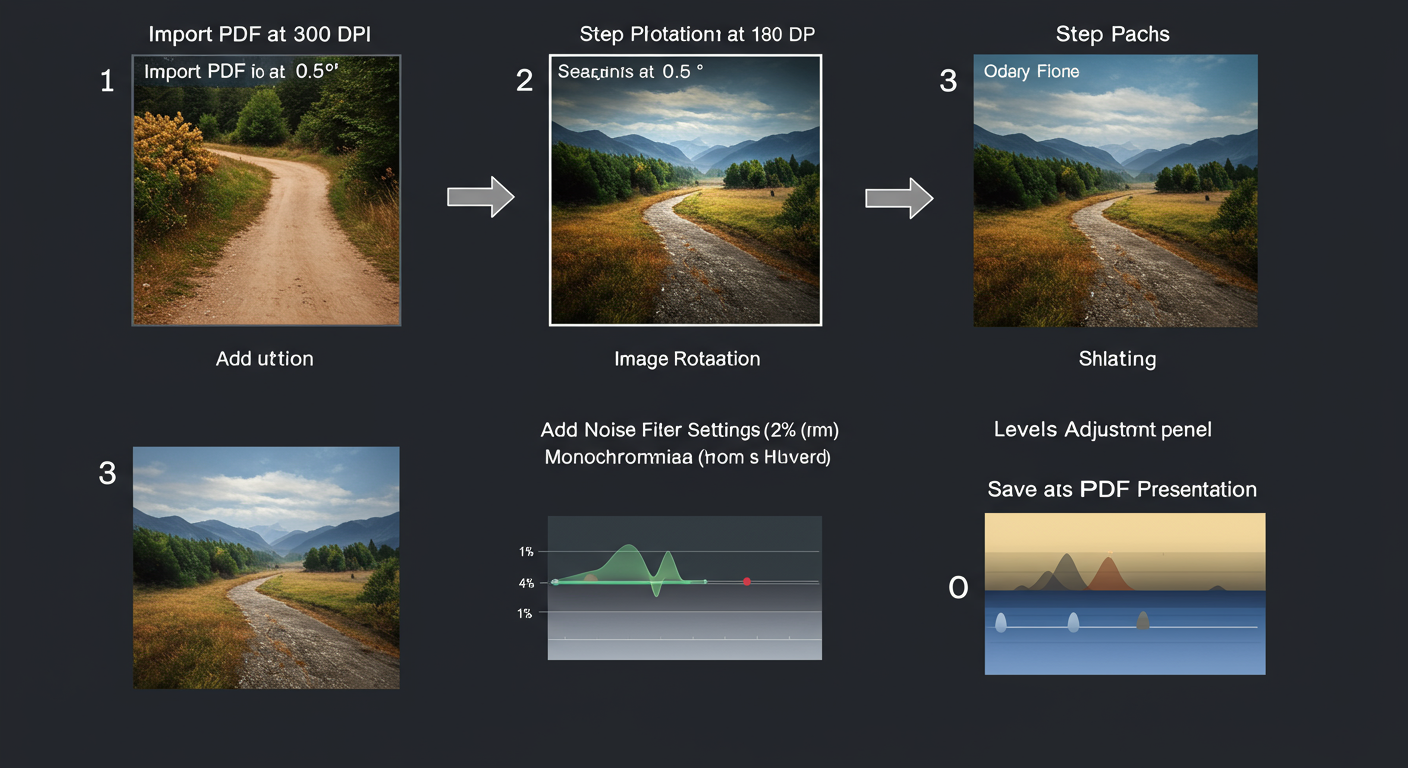
- Import Your PDF: Go to File > Open and select your PDF. Photoshop will ask which pages to import. Import them at 300 DPI for print-quality resolution. Each page will open as a separate document.
- Slightly Rotate the Canvas: This is the most important step! Go to Image > Image Rotation > Arbitrary…. Enter a tiny value like 0.5 degrees (clockwise or counter-clockwise). A perfect 90-degree angle is a dead giveaway of a digital file.
- Add Realistic Sensor Noise: Go to Filter > Noise > Add Noise…. This is the secret sauce. Use a very small amount, between 1% and 2.5%. Select Gaussian distribution and, critically, check the Monochromatic box. Color noise looks fake.
- Crush the Levels: Press Ctrl+L (Cmd+L on Mac) to open the Levels panel. Drag the far-left (black) slider slightly to the right and the far-right (white) slider slightly to the left. This deepens the blacks and brightens the whites, mimicking a scanner’s limited dynamic range.
- (Optional) Add Subtle Imperfections: Create a new layer. Select a hard, 1-2 pixel brush. Choose a dark gray color (#333333). Add 2-3 tiny dots in the margins to simulate dust. Now, lower this layer’s opacity to 15-20%. They should be almost invisible.
- Automate and Recompile: After editing all your pages (you can create a Photoshop Action to speed this up), go to File > Automate > PDF Presentation…. Add all your edited image files, ensure “Multi-Page Document” is selected, and save.
💡 Pro Tip
Create a Photoshop Action to automate steps 2-4. Once you’ve perfected your settings on one page, you can record the action and apply it to dozens of other pages in seconds. This is how pros handle multi-page documents efficiently.
Method 3: The Free Pro-Level Alternative (GIMP)
Don’t have a Photoshop subscription? No problem. GIMP (GNU Image Manipulation Program) is a powerful, free, and open-source alternative that can achieve nearly identical results. The workflow is very similar.
- Import PDF Pages: In GIMP, go to File > Open and select your PDF. It will prompt you to “Open pages as” images.
- Apply Rotation: Use the Rotate Tool (Shift+R). In the tool options, set the angle to a small value like -0.7 degrees and click “Rotate.”
- Add Noise: Go to Filters > Noise > HSV Noise…. Increase the “Value” slider slightly (e.g., to 0.05-0.10) while keeping Hue and Saturation at 0. This creates monochromatic noise.
- Adjust Contrast: Navigate to Colors > Levels… and adjust the input sliders just like in Photoshop to increase the contrast.
- Export as PDF: When you’re done, go to File > Export As…. Name your file with a .pdf extension (e.g., “final_scanned.pdf”). GIMP will automatically compile your edited images into a single multi-page PDF.
Method 4: The Power-User’s Workflow in Adobe Acrobat Pro
If you live and breathe PDFs, you might prefer to stay within Adobe Acrobat Pro. While it lacks the fine-tuned image editing of Photoshop, you can use a clever combination of features to get a very convincing result, especially for large documents.
This method works by degrading the quality in a controlled way.
- Add a “Paper” Background: Create a 1×1 pixel light gray image (#F4F4F4). In Acrobat, go to Edit PDF > More > Background > Add…. Select your pixel image. Under “Source,” choose “File.” Set the opacity to around 50-70%. This subtly dulls the pure white background.
- Optimize and Compress: This is where the magic happens. Go to File > Save as Other > Optimized PDF…. In the settings:
- Images: Set compression to JPEG with Medium quality. This introduces compression artifacts that look like a low-quality scan.
- Fonts: Unembed any non-essential fonts.
- Transparency: Flatten all transparency.
- (Advanced) Use Preflight Fixups: Go to Tools > Print Production > Preflight. In the profiles, you can find fixups like “Convert to Grayscale” which instantly gives you a black-and-white look. You can even create custom profiles to apply slight noise or other effects. According to Adobe’s own documentation, PDF preflight is a powerful tool for ensuring document standards.
💡 Pro Tip
In Acrobat’s Optimizer, experiment with the “Scan-Optimized PDF” preset. It’s designed to compress real scans, but running a digital PDF through it can sometimes produce a surprisingly authentic, slightly degraded look with minimal effort.
🎯 Key Takeaway
The secret to a believable “scanned” PDF isn’t about adding heavy effects. It’s about mastering subtlety. A tiny 0.5-degree skew and 1-2% monochromatic noise will look far more authentic than a heavily distorted and grainy document.
Settings for Realism: A Cheat Sheet
Here’s a quick reference table for the settings we’ve discussed. Use this as your starting point and adjust to taste.
| Effect | Subtle & Modern Scan | Classic B&W “Photocopy” Look |
|---|---|---|
| Rotation / Skew | 0.3 – 0.5 degrees | 0.6 – 1.0 degrees |
| Noise (Monochromatic) | 1-2% | 2-4% |
| Color Profile | Original or slightly desaturated | High-contrast Grayscale |
| Imperfections (Dust) | None or 1-2 very faint specks | 3-5 faint specks, maybe a faint line |

❓ Frequently Asked Questions
Is it legal to make a PDF look scanned?
Yes, for presentation or formatting purposes, it’s perfectly legal. However, if you use these methods to forge a signature, alter key information with intent to deceive, or commit fraud, it is absolutely illegal. The intent behind the action is what matters from a legal perspective, as outlined by many digital ethics guidelines like those from institutions such as the U.S. National Archives.
What’s the fastest free way to do this?
The fastest free method is using a reputable online “scan simulator” tool. You can get a result in under a minute. For better quality and security without spending money, downloading and learning the basics of GIMP is your best bet.
Can I make a PDF look scanned on my phone?
Yes, but it’s clunky. You’d need to use an app to convert the PDF to images, edit each image in a photo editor like Snapseed or Lightroom Mobile (to add rotation, grain, and adjust contrast), and then use another app to compile the edited images back into a PDF.
My “scanned” PDF still looks fake. What am I doing wrong?
You’re probably overdoing it. I’ve seen this a thousand times. The most common mistake is too much rotation or too much noise. A real scan’s flaws are subtle. Go back and dial every effect down by 50%. Less is truly more.
How do I get that classic black and white photocopy look?
In your image editor (Photoshop/GIMP), first convert the image to grayscale (Image > Mode > Grayscale). Then, open the Levels tool (Ctrl+L) and drag the black and white input sliders aggressively toward the center. This will blow out the whites and crush the blacks, creating that iconic high-contrast look.
Conclusion: Your New Digital Superpower
So there you have it. The ability to make a PDF look scanned is no longer some dark art. It’s a practical skill for navigating our hybrid digital-paper world. You’re now equipped to handle any request, whether it requires a quick-and-dirty online conversion or a forensically perfect replica from Photoshop.
Your next step? Choose the method that fits your immediate need. If you’re in a hurry with a non-sensitive file, try an online tool. If you’re a professional who values quality and security, take 15 minutes to master the Photoshop or GIMP workflow.
Trust me on this one: once you have this skill in your back pocket, those “scanned copy required” instructions will never cause you a moment of panic again.

