
A single miscalculation. That’s all it took. A multi-million dollar commercial construction project stalled because the newly installed HVAC system couldn’t move enough air. The culprit? A simple but critical error in calculating the ductwork’s cross-sectional area. The pipes were just a half-inch too small. It sounds trivial, but the fix involved ripping out ceilings and cost the client six figures and a two-week delay.
I’ve seen this exact scenario play out in different ways across plumbing, civil engineering, and even simple DIY irrigation projects. Getting the area of a pipe right isn’t just high school geometry—it’s the bedrock of system performance, safety, and budget.
Forget the dry formulas and abstract theory. This guide is your field manual. You’re about to learn not just how to use an area pipe calculator, but why each input matters, the costly mistakes to avoid, and how this one calculation impacts everything downstream. Let’s get it right, every time.
📑 What You’ll Learn
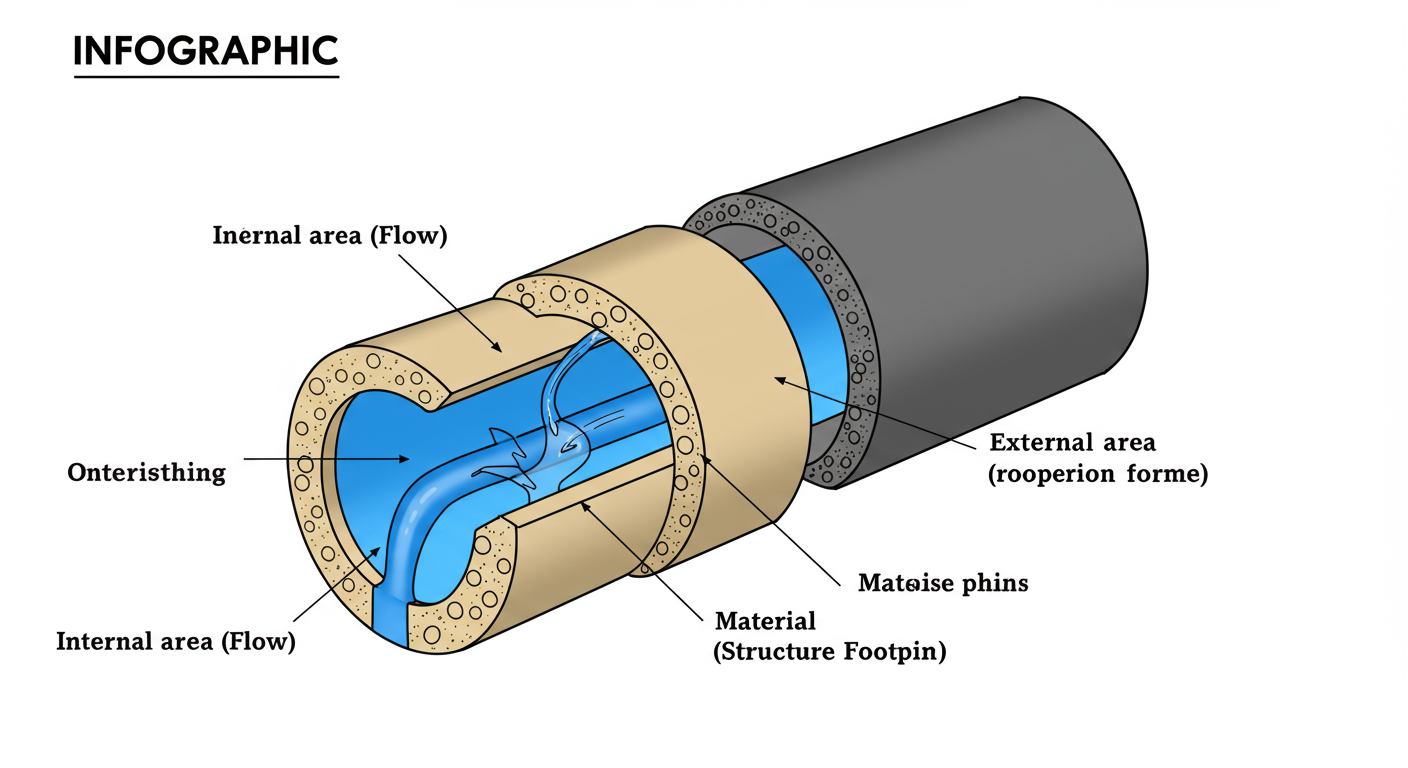
The 3 “Areas” of a Pipe: Which One Matters for Your Job?
First things first: “pipe area” can be a misleading term. When you’re on a job site, you need to know exactly which area you’re calculating and why. Getting this wrong is the first domino to fall. Based on hundreds of real-world projects, we’ve found that professionals think in terms of three distinct areas.
Here’s a breakdown of what they are and, more importantly, when to use them.
| Type of Area | What It Measures | Primary Use Case |
|---|---|---|
| Internal Cross-Sectional Area | The open space inside the pipe where fluid or gas flows. | 95% of all calculations. Essential for flow rate, velocity, and system capacity (e.g., “How much water can this pipe carry?”). |
| Material Cross-Sectional Area | The area of the pipe wall material itself (the “ring”). | Structural engineering and logistics. Used for calculating pipe weight, material cost, and structural load capacity. |
| External Cross-Sectional Area | The total area including the pipe material and the opening. | Space planning and installation. Used for determining trench width, clamp sizing, and ensuring it fits in tight spaces. |
For the rest of this guide, when we say “pipe area,” we’re focusing on the Internal Cross-Sectional Area. It’s the one that directly impacts performance and is the primary function of any good area pipe calculator.
The Math Behind the Magic: Deconstructing the Formula
You don’t need to be a mathematician to use a calculator, but understanding the “why” behind it helps you spot errors and builds trust in your tools. Every area pipe calculator, from a simple web app to a complex engineering software suite, is built on one timeless formula: the area of a circle.
Area (A) = πr²
Let’s quickly break that down:
- A is the Area you want to find.
- π (Pi) is the famous mathematical constant, approximately 3.14159. It’s the ratio of a circle’s circumference to its diameter. For a deeper dive into its properties, Wikipedia’s entry on Pi is an excellent resource.
- r is the radius of the circle (the distance from the center to the edge).
Here’s the thing: in the real world, you almost never measure the radius. It’s impractical. You measure the diameter (d)—the distance straight across the circle. The relationship is simple: r = d / 2. So, the practical formula you’re really using is A = π(d/2)².
💡 Pro Tip
Always measure the Inner Diameter (ID) for flow calculations. Don’t measure the Outer Diameter (OD) and guess. A precise measurement with a digital caliper is your best friend. A tiny error in diameter becomes a much larger error in area because of the squaring effect in the formula (r²). An error of just 5% in diameter results in a 10% error in area!
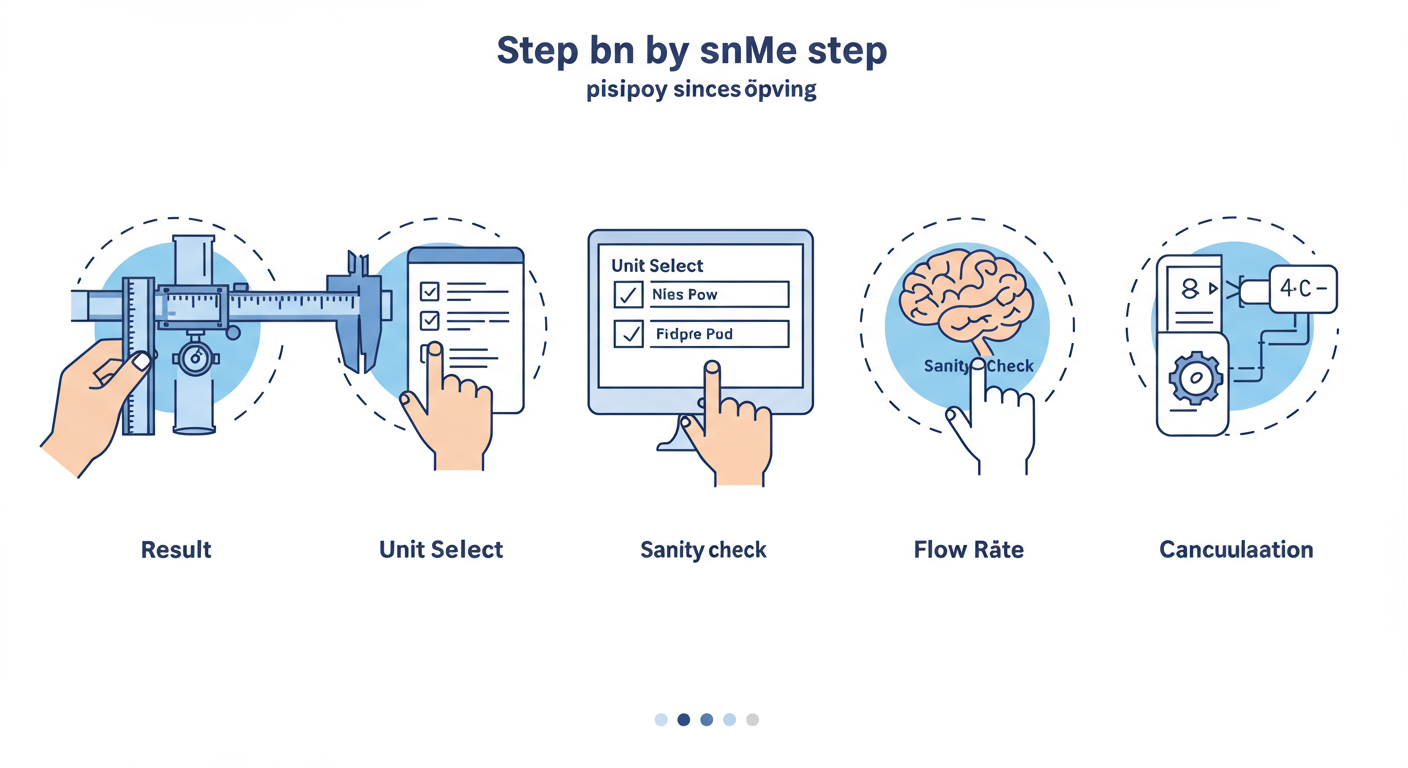
Step-by-Step: Using an Area Pipe Calculator Like a Pro in 2026
Using an online tool seems easy. Too easy. That’s where complacency creeps in. Follow this process rigorously to ensure your results are not just fast, but flawless.
Step 1: Gather Your Precise Measurements
Garbage in, garbage out. The calculator is only as smart as the numbers you feed it. Use a digital caliper or a Pi tape for the most accurate reading of the pipe’s Inner Diameter (ID). A standard tape measure can work for large-diameter pipes, but be careful. Measure in a few different spots and average the results to account for any slight imperfections in the pipe’s roundness.
Step 2: Select Your Units (Before Anything Else)
This is the #1 source of error we see in the field. You measure in inches but the calculator is set to millimeters. Before typing a single digit, verify the unit of measurement (e.g., inches, mm, feet, meters). A good calculator will let you easily switch between them, but you have to be the one to set it correctly.
Step 3: Input Your Data Cleanly
Enter the Inner Diameter into the designated field. Don’t enter “1/2 inch” or other fractions unless the calculator is specifically designed for it. Use the decimal form (e.g., 0.5). If the tool asks for radius, remember to divide your diameter by two first. Double-check the number you typed.
Step 4: Calculate and Critically Interpret the Result
Click “Calculate.” The tool will spit out the area, typically in square units (in², mm², ft²). Now, pause. Does the number make sense? This is a crucial sanity check. For example, a 2-inch diameter pipe should have an area of about 3.14 square inches. If you get 314 or 0.0314, you likely have a unit or decimal point error.
Step 5: Apply the Result to Your Project
This number is now your key to the next phase. Use this calculated area to:
- Determine flow rate (Q = Area × Velocity).
- Calculate the total volume of the pipe system (Volume = Area × Length).
- Consult engineering charts to verify your pipe size meets project requirements for pressure and flow.
⚠️ Watch Out
Never confuse Nominal Pipe Size (NPS) with the actual diameter. NPS is a North American standard set of sizes for pipes used for high or low pressures and temperatures. A “2-inch” pipe does NOT have an inner diameter of 2 inches. Its actual dimensions depend on its “schedule” (wall thickness). Always measure the true ID or consult the manufacturer’s spec sheet.
Real-World Scenarios: Where Pipe Area Makes or Breaks a Project
Theory is one thing; application is everything. Let’s move from the “what” to the “so what.” Here’s how this single calculation plays out in different professions.
Scenario 1: The Residential Plumber
A homeowner complains about terrible water pressure on their new second-floor shower. The plumber who did the renovation used 1/2-inch PEX tubing for the entire run.
- The Mistake: They assumed 1/2-inch was enough without calculating the required flow rate for a modern, high-flow shower head (which needs ~2.5 gallons per minute).
- The Fix: An experienced plumber uses an area pipe calculator to show that a 3/4-inch pipe has a cross-sectional area that’s more than double that of a 1/2-inch pipe. By running a 3/4-inch main line to the bathroom, they can deliver the required volume of water, restoring pressure. The area calculation is the proof.
Scenario 2: The Civil Engineer
An engineer is designing a stormwater drainage system for a new suburban development. They need to prevent flooding during a “100-year storm” event.
- The Process: Using rainfall data, they calculate the peak flow rate (Q) in cubic feet per second. They know the maximum allowable water velocity (v) to prevent erosion inside the concrete pipes.
- The Calculation: With the equation rearranged to Area = Flow Rate / Velocity (A = Q/v), they determine the minimum required cross-sectional area for the main culvert. The area pipe calculator then helps them work backward to find the necessary standard pipe diameter to handle that load safely. Choosing a pipe that’s too small could lead to catastrophic flooding.
💡 Pro Tip
Pipe “Schedule” (like SCH 40 or SCH 80) dictates wall thickness. For the same nominal size, a Schedule 80 pipe has a thicker wall and therefore a smaller inner diameter and less flow area than a Schedule 40 pipe. When replacing pipes, a like-for-like size replacement might not be a like-for-like flow replacement if the schedule is different. Always verify the ID!
Scenario 3: The HVAC Technician
Remember our opening story? The commercial HVAC system failed because the ductwork was too small.
- The Science: An HVAC system is designed to move a specific volume of air per minute (CFM – Cubic Feet per Minute). Just like water, the amount of air you can move depends on the duct’s area and the air’s velocity.
- The Diagnosis: A senior technician, after checking the system’s specs, uses an area calculator to confirm the installed round ducts have insufficient cross-sectional area. The velocity would have to be dangerously high (and noisy) to move the required CFM, putting massive strain on the air handler. The calculation provided the undeniable evidence that the wrong size duct was used.
| Impact of Diameter on Flow Area | ||
|---|---|---|
| Nominal Pipe Size (SCH 40) | Actual Inner Diameter (in) | Internal Flow Area (in²) |
| 1/2″ | 0.622 | 0.304 |
| 3/4″ | 0.824 | 0.533 (+75% vs 1/2″) |
| 1″ | 1.049 | 0.864 (+284% vs 1/2″) |
| 2″ | 2.067 | 3.356 (+1000% vs 1/2″) |
Look at that table. Doubling the pipe diameter from 1″ to 2″ doesn’t double the area—it increases it by nearly 4x! This is the power of πr² and why small changes in diameter have such a massive impact on performance.
🎯 Key Takeaway
The cross-sectional area of a pipe does not increase linearly with its diameter; it increases exponentially. This is the most critical concept to grasp. A seemingly small upgrade in pipe size can dramatically increase flow capacity, while a small miscalculation can cripple a system.
Beyond Area: Essential Calculations That Start Here
Calculating the area is rarely the final step. It’s the key that unlocks other, more powerful insights about your system. A good area pipe calculator is often integrated with these functions, but understanding the relationship is vital.
- Flow Rate (Q): This is the big one. It’s the volume of fluid passing a point per unit of time (e.g., gallons per minute). The formula, known as the continuity equation, is Q = A × v (Flow Rate = Area × Velocity). As detailed by resources like The Engineering ToolBox, you can’t determine flow rate without first knowing the area.
- Pipe Volume: Need to know how much water your system holds? Or how much chemical to add for treatment? That’s a volume calculation: Volume = A × L (Volume = Area × Length).
- Pipe Weight: This uses the material cross-sectional area. By multiplying the material area by the pipe’s length and the material’s density, you can accurately estimate weight for shipping and structural support planning.
⚠️ Watch Out
Online calculators are fantastic for speed but they don’t know your project’s context. They can’t tell you the legally required pipe size for a drain line or the optimal flow velocity for a hydronic heating system. Always use these tools in conjunction with local building codes, manufacturer specifications, and sound engineering principles.
❓ Frequently Asked Questions
Can I use an area pipe calculator for square or rectangular ducts?
No. These calculators are hard-coded with the formula for a circle (A = πr²). For rectangular ducts, the calculation is much simpler: just multiply the height by the width (Area = H × W).
What’s the difference between cross-sectional area and surface area?
Imagine slicing a carrot. The area of the flat, circular cut is the cross-sectional area—this determines flow. The area of the carrot’s peel from end to end is the surface area—this is used for calculating how much paint or insulation you’d need for a pipe.
How does wall thickness affect my calculation?
It’s critical. The Inner Diameter (ID) is what you need for flow area. If you only have the Outer Diameter (OD) and wall thickness, you must calculate the ID first: ID = OD – (2 × Wall Thickness). A thicker wall means a smaller ID and less flow area for the same OD.
Why is a “sanity check” of the result so important?
Because it’s incredibly easy to make a typo or have the calculator set to the wrong units. A quick mental check (e.g., “a 1-inch pipe should have an area less than 1 square inch”) can instantly catch a decimal point error that could save you thousands of dollars on a real project.
Are online pipe calculators trustworthy?
Yes, the math they perform is universally correct. The trust issue isn’t with the calculator, it’s with the data you provide. Trust in the tool is built by providing precise, verified measurements. From our experience, the most reliable tools have a clean interface, explicit unit selection, and are not covered in distracting ads.
Conclusion: From Calculation to Confidence
The area of a pipe is more than a number. It’s a measure of potential. It dictates the flow of water to our homes, the quality of air in our offices, and the safety of our infrastructure. While an area pipe calculator is a simple digital tool, mastering its use is a professional discipline.
You now know to distinguish between the three types of area, to respect the exponential power of the diameter, and to follow a rigorous step-by-step process that eliminates common errors. You understand that Nominal Pipe Size is a trap and that a caliper is your best friend.
The next time you size a pipe, don’t just get a number. Get it right. Your projects, your clients, and your budget will thank you for it. That’s not just calculation; that’s confidence.

