You have a brilliant visual in your mind: a photorealistic portrait of Cleopatra working on a laptop, a cyberpunk city built from glowing crystals, a whimsical logo for your new brand. But you’re not a digital artist, and the budget for one is non-existent. A few years ago, that was a dead end.
Today, it’s a starting line.
Welcome to the revolution of text-to-image AI, where your words are the paintbrush and sophisticated algorithms are your canvas. Learning how to generate AI images is no longer a niche skill for tech geeks; it’s a creative superpower for marketers, founders, authors, and anyone with an idea. But there’s a chasm between typing “a dog on a skateboard” and architecting a prompt that produces a masterpiece.
This is your masterclass. We’re skipping the fluff to give you the battle-tested strategies, advanced prompt engineering, and mental models you need to transform simple concepts into jaw-dropping visuals. You won’t just learn what to type, but why it works.
📑 What You’ll Learn
- Why AI Image Generation is a Creative Game-Changer
- Under the Hood: How AI Magically Turns Words into Worlds
- Your 5-Step Blueprint for Creating Stunning AI Images
- The Art of Prompt Engineering: From Basic to Pro
- Beyond the Basics: Advanced AI Image Control
- The Ethical Tightrope of AI-Generated Art
- Frequently Asked Questions
Why AI Image Generation is a Creative Game-Changer
The ability to conjure visuals from pure text has fundamentally shattered the traditional creative workflow. In our experience running dozens of digital campaigns, the impact is undeniable. It’s a paradigm shift in speed, cost, and raw imaginative power.
- Unprecedented Velocity: A traditional photoshoot or custom illustration can take days, if not weeks, of planning and execution. An AI can generate a dozen high-concept variations in under five minutes. This enables rapid prototyping and A/B testing of visual concepts at a scale that was previously unimaginable.
- Radical Cost Efficiency: The recurring costs of stock photography subscriptions, freelance artist commissions, and custom graphics can cripple a marketing budget. Generating unique, on-brand assets on demand effectively eliminates these expenses for countless use cases, from blog post headers to social media content.
- Boundless Creative Exploration: AI models don’t have creative blocks. They can effortlessly fuse concepts a human artist might struggle to visualize, like “a baroque-style library on a starship” or “a watercolor painting of a neural network.” This unlocks entirely new frontiers for visual storytelling and brand identity.
Under the Hood: How AI Magically Turns Words into Worlds
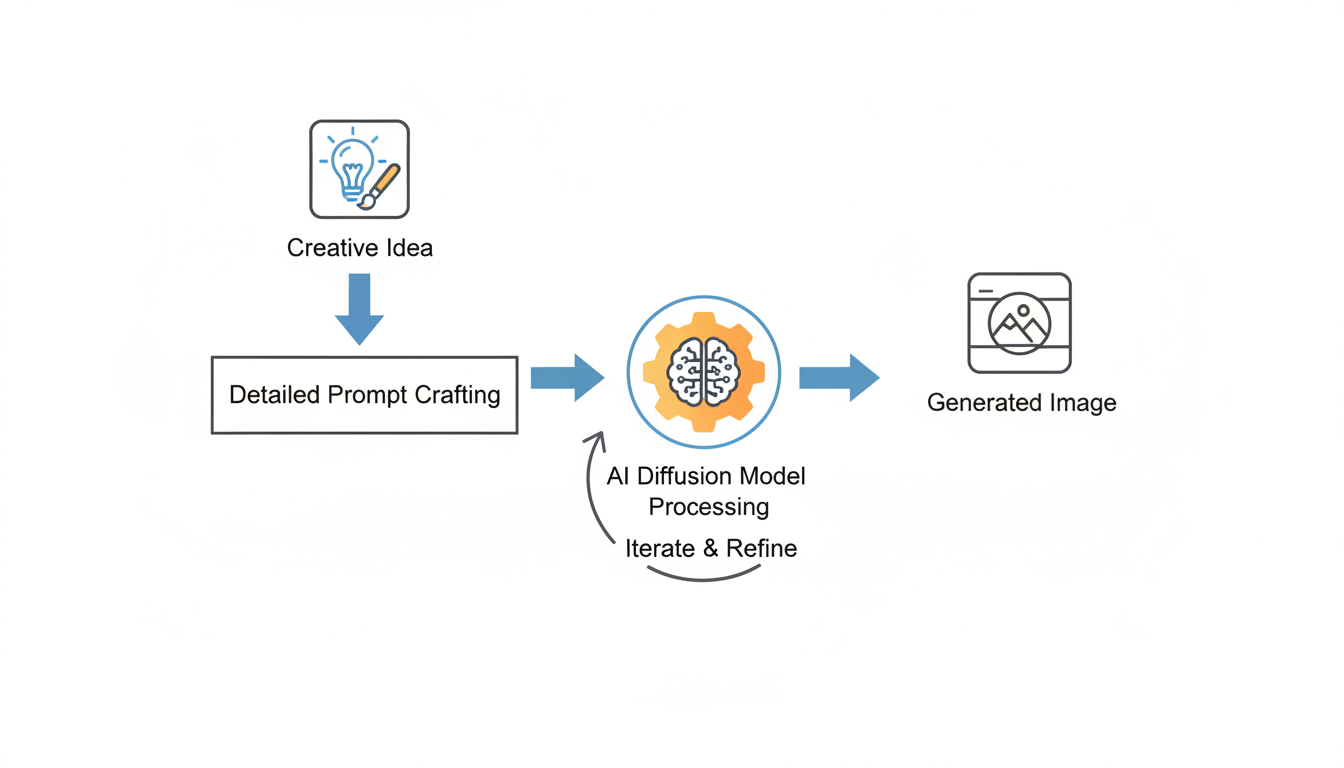
To truly master this craft, you need a basic understanding of the magic behind the curtain. Most modern AI image generators—from Midjourney and DALL-E 3 to Stable Diffusion—are built on a technology called a diffusion model.
Imagine a sculptor who starts with a solid block of marble and chips away until a statue emerges. The AI does the opposite. It starts with a canvas of pure random noise (think TV static) and, guided by your text prompt, meticulously adds structure. Step by step, it refines this chaos, “denoising” it into a coherent image that perfectly matches your description. This is possible because the AI has been trained on billions of image-and-text pairs, giving it a profound, near-human understanding of how words relate to visual concepts.
According to Google’s AI research, the sophistication of these models now allows for “unprecedented degrees of photorealism and language understanding,” which is why your prompts can be increasingly complex and nuanced.
💡 Pro Tip
Look for a “Sampling Steps” or “Quality” setting in your tool. A higher number of steps means the AI takes more passes at refining the image from noise. For quick drafts, 20-30 steps is fine. For a final, high-detail render, we recommend pushing this to 50 or higher. The difference in clarity and coherence can be stunning.
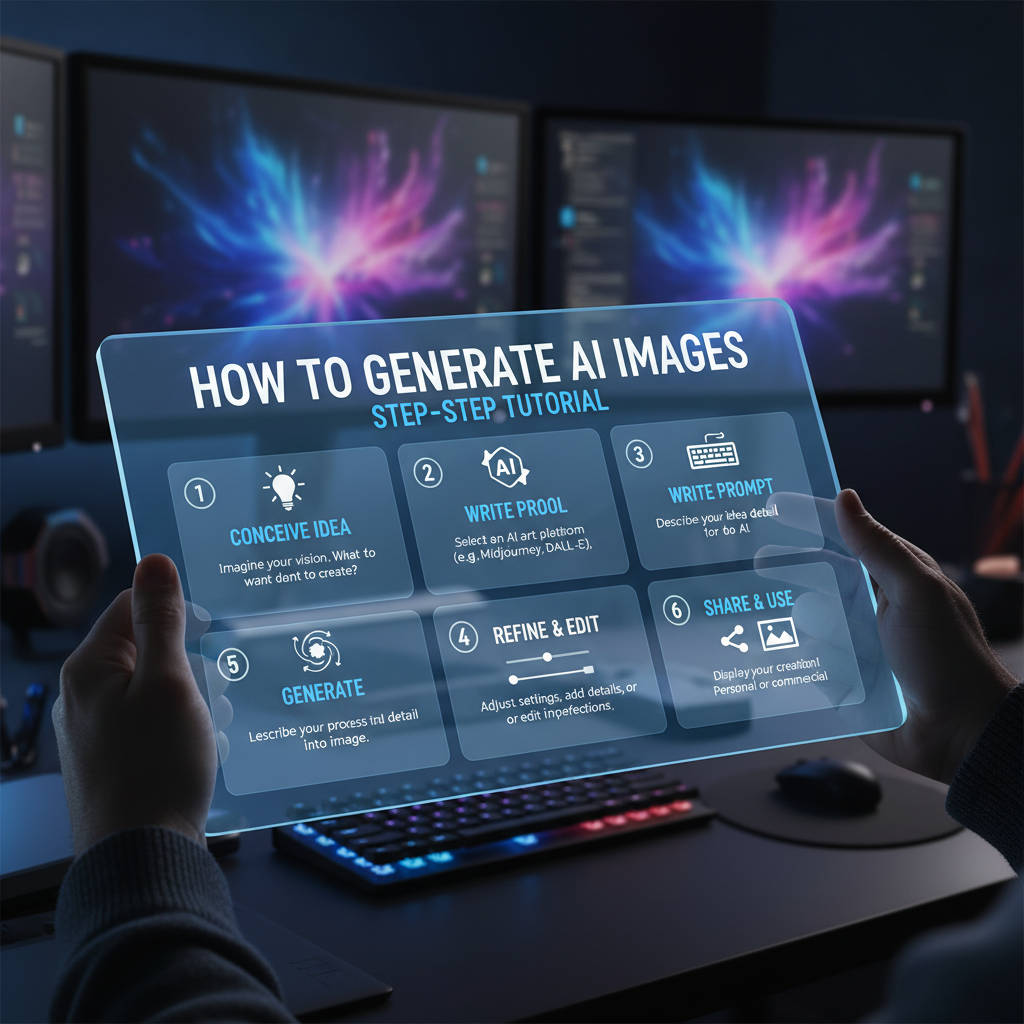
Your 5-Step Blueprint for Creating Stunning AI Images
While specific user interfaces differ, the creative process for generating high-quality AI images is universal. This is the battle-tested workflow we use for all our projects, from concept art to final marketing assets.
-
Step 1: Crystallize Your Vision
Before you write a single word, stop. Close your eyes. What do you truly see? Don’t just think “a knight.” Get specific. Is he a weary, battle-scarred knight with dented, muddy armor? Or a shining paladin in ornate, polished silver plate? What is the mood? Is he standing in a sun-drenched meadow or a gloomy, mist-shrouded forest? A crystal-clear vision is the bedrock of a great result.
-
Step 2: Architect Your Master Prompt
This is where the art and science collide. A great prompt is a recipe for the AI. We teach a layered approach: start with the core Subject, then add descriptive “tokens” for Style, Lighting, Composition, and Mood. We’ll dive deep into this in the next section. For now, remember this mantra: be descriptive, not demanding. Guide the AI; don’t just bark keywords at it.
-
Step 3: Dial In Your Technical Parameters
Your prompt is the “what,” and the settings are the “how.” Mastering these parameters separates the pros from the amateurs. Key settings to look for include:
- Aspect Ratio: Never settle for the default square unless you need it. Use 16:9 for cinematic landscapes and thumbnails, 9:16 for social media stories, or 3:2 for a classic photographic feel.
- Negative Prompts: This is non-negotiable for quality. Tell the AI what you don’t want. A standard negative prompt we use is: “blurry, deformed, disfigured, poor anatomy, bad hands, extra limbs, ugly, watermark, text.”
- Guidance Scale (CFG): This slider tells the AI how strictly to follow your prompt. A lower value (e.g., 4-6) gives the AI more creative freedom, which is great for abstract concepts. A higher value (e.g., 8-12) forces it to adhere closely to your text, ideal for specific commercial work.
-
Step 4: Generate, Analyze, Iterate
Your first generation is a first draft, not a final product. Analyze it critically. What worked? What didn’t? Is the lighting too harsh? Is the composition boring? Tweak one or two elements in your prompt, adjust a setting, and generate again. From real-world campaigns, we’ve found that the most exceptional images often emerge after 3-5 rounds of thoughtful iteration.
-
Step 5: Refine and Upscale
Once you have a generation you love, it’s time for post-production. Use a built-in or third-party AI upscaler to increase the resolution for printing or high-quality digital display. This is also where you can use advanced techniques like “inpainting” to fix minor flaws—like correcting a weird-looking finger or adding a small detail the AI missed.
⚠️ Watch Out
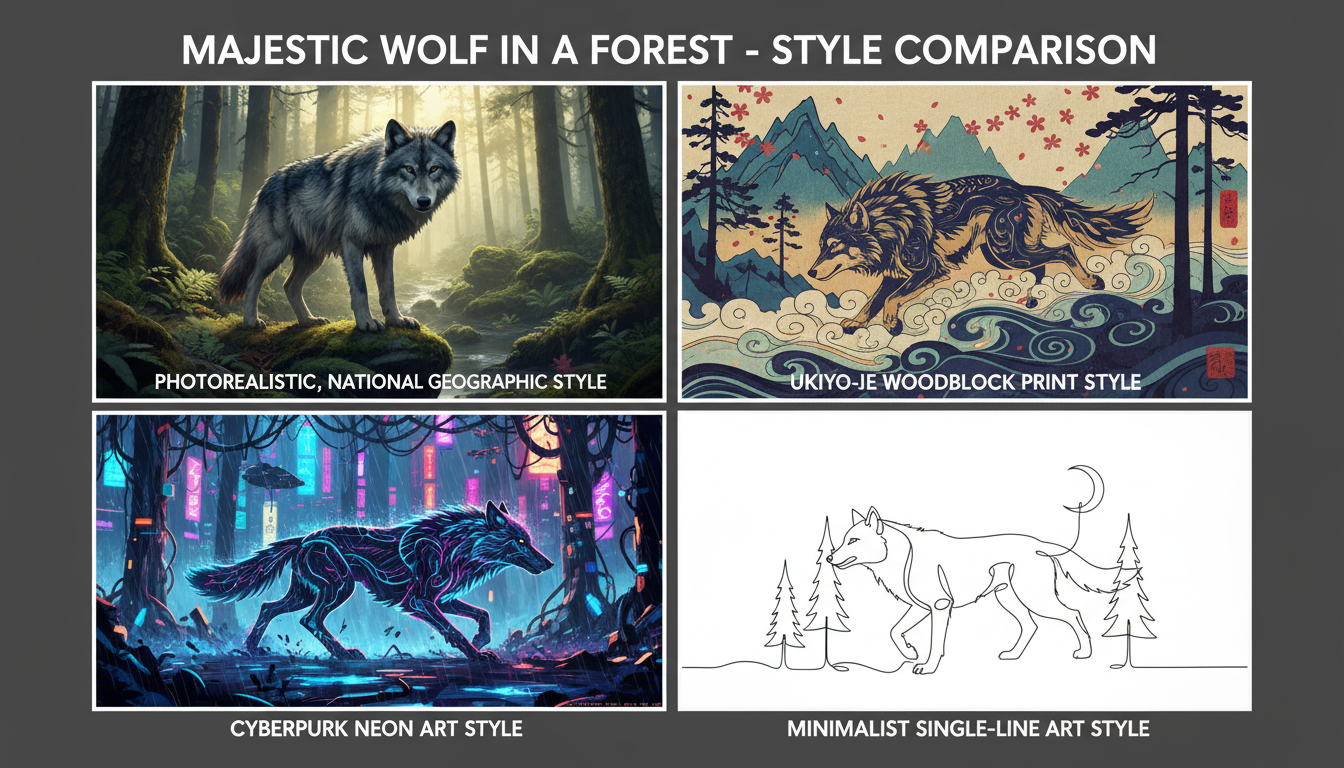
Avoid “keyword soup.” Jamming dozens of conflicting terms into a single prompt (e.g., “photorealistic, cartoon, Van Gogh style, minimalist, intricate detail, simple”) will confuse the AI. It leads to a muddy, incoherent image that fails at everything. Choose a clear, singular artistic direction and build your prompt around it.
The Art of Prompt Engineering: From Basic to Pro
Prompting is a new kind of language. The more fluently you speak it, the better your results will be. A beginner tells the AI what to make; an expert shows the AI how to make it. Let’s break down the difference with practical examples.
| Concept | Basic Prompt (The “What”) | Professional Prompt (The “How”) |
|---|---|---|
| A wizard’s room | A wizard’s room with books and potions. | Expansive wizard’s study in a stone tower, ancient leather-bound grimoires stacked high, glowing alchemical potions on oak shelves, cinematic volumetric light rays streaming through a gothic arched window, hyper-detailed, fantasy concept art, 8k. |
| A sports car | A red sports car on a road. | Sleek red Italian hypercar on a winding coastal road at sunset, dynamic motion blur, dramatic golden hour lighting, reflections on wet asphalt, professional automotive photography, shot on a 50mm f/1.8 lens, photorealistic. |
| A robot | A friendly robot. | Charming retro-futuristic robot barista, polished chrome body with brass fittings, friendly glowing blue optic sensors, 1950s American diner background, shallow depth of field, detailed digital illustration, style of Syd Mead. |
The professional prompts are not just longer; they are structured blueprints. They consistently include these five key elements:
- Subject & Setting: Be ultra-specific. “Ancient leather-bound grimoires,” not just “books.” “1950s American diner,” not just “a background.”
- Style & Medium: Define the artistic genre. “Fantasy concept art,” “professional automotive photography,” “digital illustration.”
- Lighting: This is the secret to mood. “Volumetric light rays,” “dramatic golden hour lighting.” Lighting is everything.
- Composition & Lens: Mimic real-world photography. “Shallow depth of field,” “shot on a 50mm f/1.8 lens,” “dynamic motion blur.”
- Quality & Detail: Push the AI to its limits. “Hyper-detailed,” “8k,” “photorealistic.”
🎯 Key Takeaway
Mastering AI image generation isn’t about memorizing secret keywords. It’s about learning to communicate with precision, intent, and artistic vision. The quality of your output is a direct reflection of the quality and depth of your input—your prompt is the single most important factor.
Beyond the Basics: Advanced AI Image Control
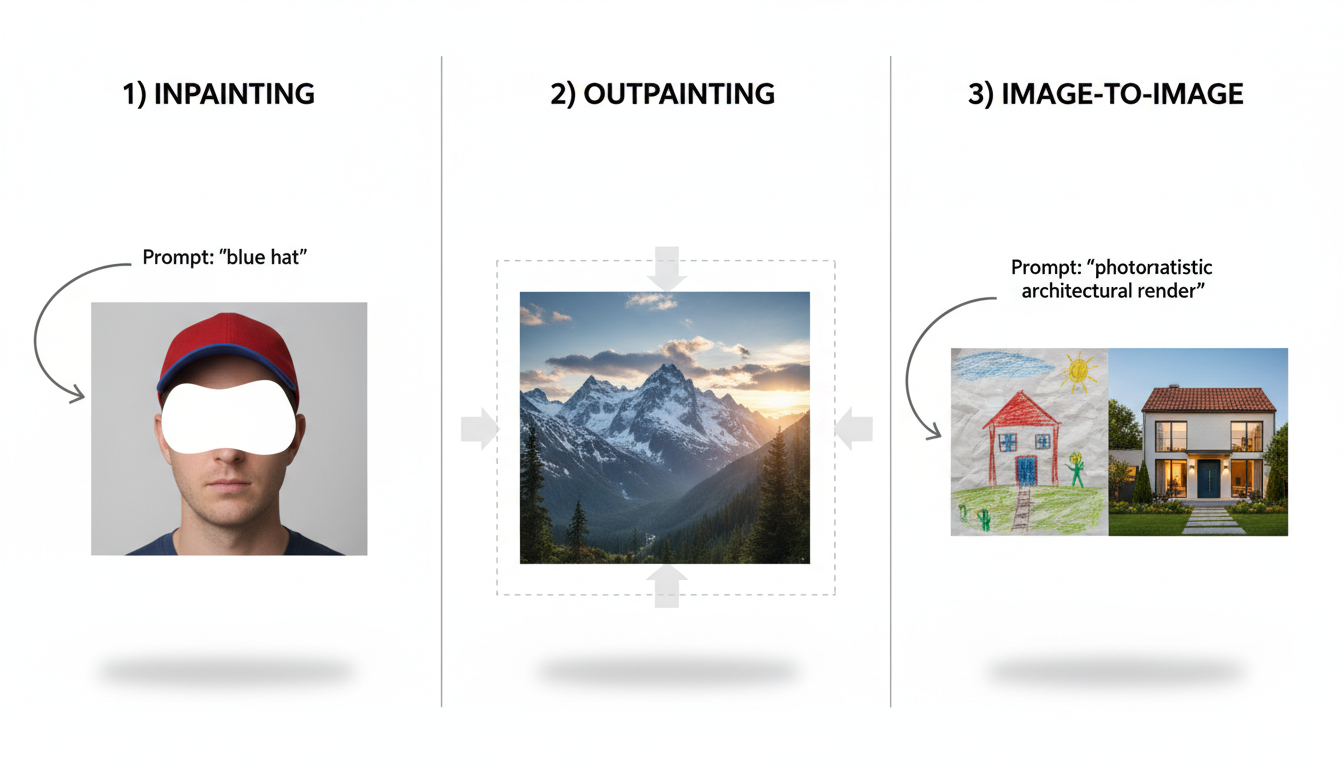
Once you’ve mastered prompting, you can unlock a new level of granular control with more advanced features. Based on our hands-on testing, these three techniques are absolute game-changers for achieving professional, pixel-perfect results.
| Technique | What It Does | Best Use Case |
|---|---|---|
| Image-to-Image (img2img) | Uses a starting image (even a rough sketch) plus a text prompt. The AI uses your image’s composition as a guide while applying the style from your prompt. | Turning a basic mockup into a polished concept, restyling existing photos, or maintaining a consistent character layout across different scenes. |
| Inpainting | Lets you “mask” a specific area of a generated image and provide a new, targeted prompt to regenerate only that section. | Fixing common AI errors (like mangled hands), changing an object’s color, or adding a new element to a scene without starting from scratch. |
| Outpainting (Canvas Expansion) | Expands the canvas beyond the original image borders. The AI intelligently fills in the new space based on the existing content and your prompt. | Turning a close-up portrait into a full-body shot, extending a landscape to a wider format, or converting a square image into a cinematic banner. |
💡 Pro Tip
For consistent characters across multiple images, find and use the “seed” number. A seed is the unique starting number for the random noise generation. By using the same seed number and a similar prompt, you can generate variations of the same character in different poses or settings—an invaluable technique for storytelling or branding projects.
The Ethical Tightrope of AI-Generated Art
With great creative power comes great responsibility. The explosion of AI image generation has ignited critical conversations around copyright, artist attribution, and inherent data bias. As a creator, it’s vital to be a thoughtful and responsible user of this technology.
- Copyright & Licensing: The legal landscape is a moving target. While many platforms grant you full commercial rights to your generations, the underlying copyright status of AI art is complex and varies by jurisdiction. Always check the terms of service for the specific tool you’re using before deploying assets in a commercial project.
- Artist Styles: AI models learn from the work of countless human artists. While prompting “in the style of Van Gogh” is generally fine, using the name of a living, working artist for commercial gain is ethically dubious and a subject of intense industry debate. Leading experts recommend focusing on descriptive styles rather than specific artist names.
- Inherent Model Bias: AI models are trained on vast datasets from the internet, and they can inherit its societal biases. Be mindful that a generic prompt for “a successful CEO” may disproportionately generate images of a certain gender or race. You can and should counteract this with more specific, inclusive prompting.
⚠️ Watch Out
Deepfakes and misinformation are the dark side of this technology. Never use AI image generators to create malicious, deceptive, harassing, or harmful content. Responsible, ethical use is paramount to ensuring this technology remains a tool for creativity, not deception.
Your Canvas is Waiting: Go Create
Learning how to generate AI images is a journey of discovery, not a single destination. You’ve now moved beyond simple commands and have a professional framework for thinking like an AI art director. You understand the core technology, the 5-step creation blueprint, the art of multi-layered prompt engineering, and the advanced techniques that separate amateurs from pros.
The technology is evolving at a dizzying pace, but the core principles of clear communication and strong artistic vision will always be the key to success. The most powerful tool isn’t the AI model; it’s your own creativity, now amplified a thousandfold.
So, what’s your next step? Don’t just read—create. Take one of the professional-level prompts from this guide, head to your favorite AI image generator, and spend the next 30 minutes iterating. Change the lighting. Swap the style. Experiment with the CFG scale. The canvas is blank, and your imagination is the only limit.
❓ Frequently Asked Questions
What is the best way to start learning how to generate AI images?
Start with a user-friendly, web-based tool to avoid a complex setup. Begin with a simple subject (e.g., “a fox in the snow”) and systematically add one new element at a time—first a style (“as a watercolor painting”), then lighting (“during golden hour”), then composition (“close-up portrait”). This methodical approach teaches you how each component influences the final result.
Do I need a powerful computer to generate AI art?
No. While running models like Stable Diffusion locally requires a powerful graphics card (GPU), the vast majority of popular platforms (like Midjourney, DALL-E 3, and other web-based tools) are cloud-based. All the heavy processing happens on their servers, meaning you can generate incredible images from a standard laptop, tablet, or even your phone.
Can I use AI-generated images for commercial purposes?
This depends entirely on the terms of service of the specific AI tool you use. Many leading platforms grant you full ownership and commercial rights to the images you create. However, some have restrictions. It is absolutely crucial to read and understand the licensing agreement for your chosen platform before using images in a commercial project.
How can I make my AI images look more realistic?
For photorealism, use a vocabulary borrowed from professional photography. Include terms like: “photorealistic,” “hyper-realistic,” “8k UHD,” “shot on a Canon R5 with a 35mm f/1.4 lens,” “cinematic lighting,” “sharp focus,” and “shallow depth of field.” These specific technical keywords guide the AI away from an “artistic” interpretation and toward a realistic one.
What are negative prompts and why are they so important?
Negative prompts are instructions that tell the AI what to avoid including in the image. They are one of the most powerful tools for quality control. By adding a standard set of negative terms like “blurry, deformed, disfigured, bad anatomy, extra limbs, ugly, watermark, text, signature,” you can effectively filter out the most common AI generation flaws, leading to a much cleaner and more professional final image.
How do I create a consistent character in different AI images?
Achieving character consistency is an advanced skill. The most effective method is to use the “seed” number. A seed is the starting point for the AI’s random generation. By using the same seed number, a very similar prompt, and only changing the action or setting (e.g., “a knight standing” to “a knight fighting”), you can generate multiple images of the same character. Some platforms are also introducing dedicated character reference features.

