That stiff, achy feeling in your lower back after hours hunched over a screen? We all know it. It’s a modern epidemic of tension, a physical price we pay for our digital lives. But what if one of the most powerful antidotes wasn’t a fancy gadget or an expensive therapy, but a simple, profound movement you can do right now?
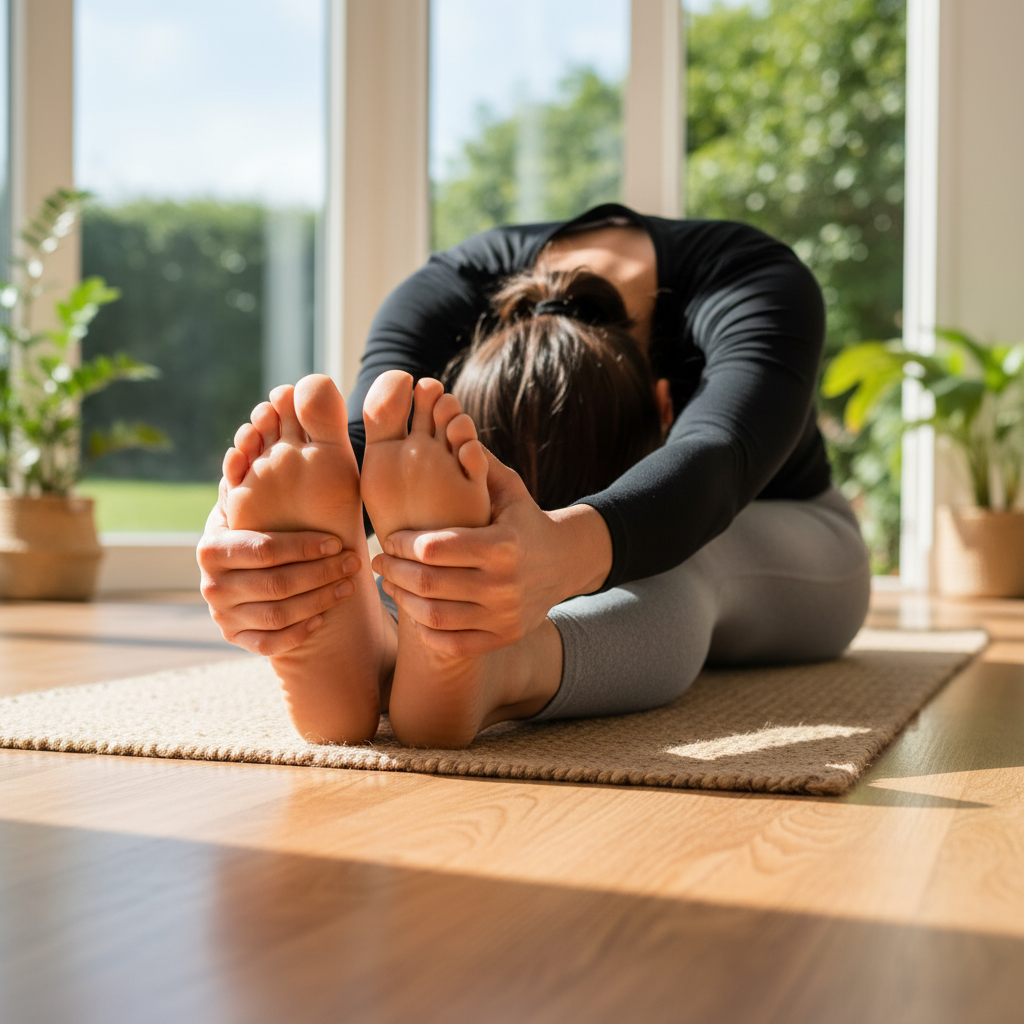
I’m talking about the Hands to Feet Pose, known in yoga as Uttanasana. Forget just “touching your toes.” This foundational posture is a full-body reset button. It’s a potent tool for decompressing your spine, releasing chronically tight hamstrings, and hitting the mute button on your body’s stress response.
In this deep dive, we’re going beyond the basics. You’re about to learn not just how to perform this pose, but how to master it. We’ll uncover the science behind its calming effects, break down flawless form, and show you smart modifications that make it accessible for every body. Let’s unfold.
📑 What You’ll Learn
- More Than a Stretch: The Surprising Science Behind Uttanasana
- The Perfect Fold: Your Step-by-Step Guide to Safe Alignment
- Are You Making These 3 Common Uttanasana Mistakes?
- Your Body, Your Fold: Smart Modifications for Every Level
- Level Up Your Practice: Advanced Variations & Sequencing
- Frequently Asked Questions
More Than a Stretch: The Surprising Science Behind Uttanasana
At first glance, the Hands to Feet Pose looks like a simple hamstring stretch. And it is—a fantastic one. But its real power lies deeper. This is a holistic posture that impacts your entire nervous system, improves organ function, and provides a unique mental release. It’s less about forcing flexibility and more about letting go.
Here’s what’s really happening when you fold forward:
- Spinal Decompression: As you hang, gravity provides gentle traction for your spine. This creates space between the vertebrae, which can help relieve pressure on the discs and nerves. Think of it as a natural, passive way to counteract the compression from sitting all day.
- Nervous System Reset: Forward folds are inherently calming. By tucking inward and bringing your head below your heart, you stimulate the parasympathetic nervous system—your body’s “rest and digest” mode. This actively lowers your heart rate and blood pressure, melting away stress. Research from institutions like the National Center for Complementary and Integrative Health highlights yoga’s significant effects on stress management.
- Improved Circulation & Digestion: The gentle compression on your abdominal organs massages them, stimulating blood flow to your digestive system. This can aid in everything from reducing bloating to improving organ efficiency. The inversion also sends a fresh rush of oxygenated blood to your brain, which can boost clarity and reduce fatigue.
- Posterior Chain Release: This pose is the gold standard for lengthening the entire back line of your body—from your calves and hamstrings all the way up to your glutes and lower back. Tight hamstrings are a primary culprit in lower back pain, and releasing them here provides immense relief.
But how does Uttanasana stack up against other common forward folds? Each has a unique focus.
| Pose Feature | Hands to Feet Pose (Uttanasana) | Seated Forward Fold (Paschimottanasana) | Wide-Legged Forward Fold (Prasarita Padottanasana) |
|---|---|---|---|
| Primary Target | Hamstrings, Calves, Entire Spine | Hamstrings, Lower Back | Inner Thighs (Adductors), Hamstrings |
| Key Benefit | Spinal traction via gravity, nervous system calming | Deep, focused hamstring release, requires active spinal lengthening | Hip opening, groin stretch |
| Best For | Counteracting sitting, stress relief, full-body release | Targeting very tight hamstrings with more control | Athletes, improving hip mobility |
The Perfect Fold: Your Step-by-Step Guide to Safe Alignment
Mastering Uttanasana is all about the hinge, not the round. Rushing the movement or folding from your waist puts your lower back at risk. Based on hands-on teaching experience, this is the safest and most effective way to approach the pose.
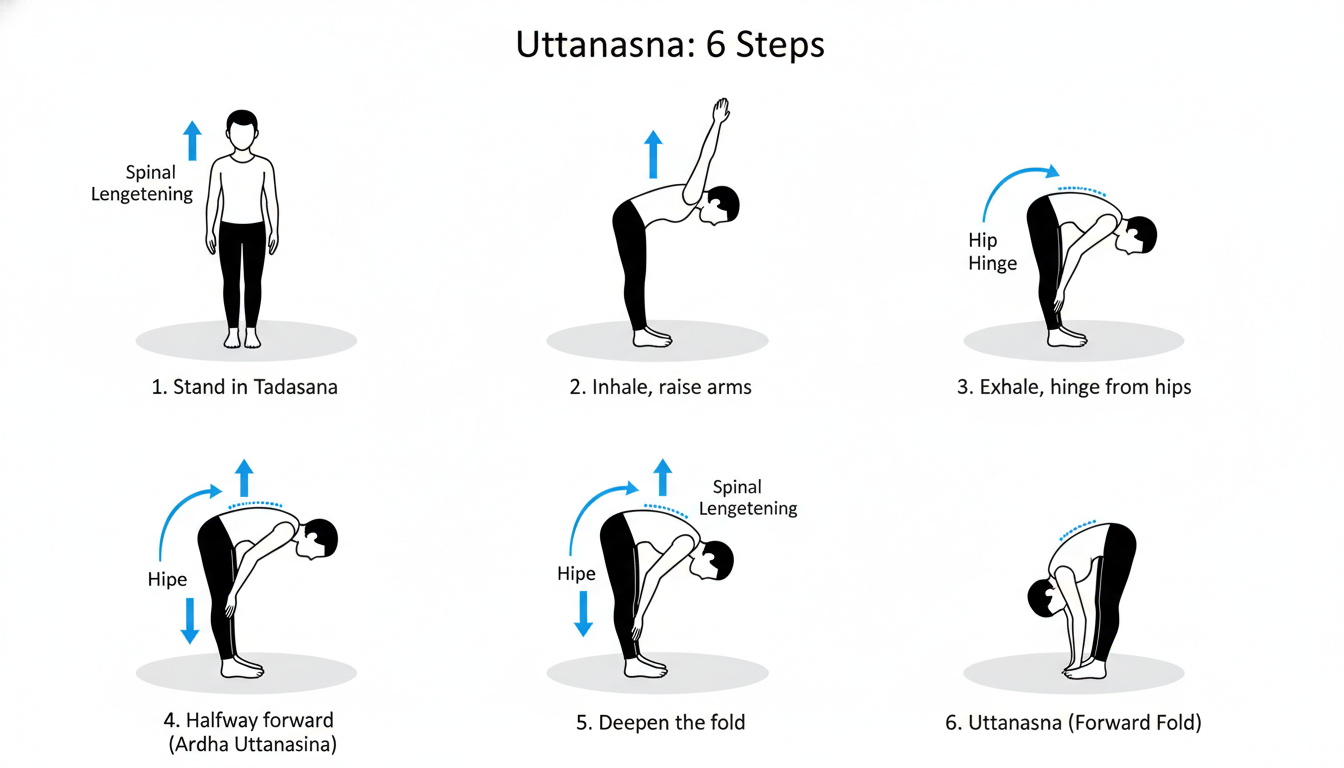
- Step 1: Find Your Foundation (Tadasana). Stand at the top of your mat, feet hip-width apart. Press down firmly through all four corners of your feet. Feel the ground beneath you. Engage your quadriceps (thigh muscles) by gently lifting your kneecaps. This small action protects your knee joints.
- Step 2: Inhale and Lengthen. Take a deep breath in and sweep your arms out and up overhead. As you reach, think about creating as much length as possible in your spine. Lift your ribcage away from your hips. You’re creating the space you’ll need to fold into.
- Step 3: Exhale and Hinge from the Hips. This is the most critical step. As you exhale, begin to fold forward by hinging at your hip crease, not by rounding your back. Keep your spine long and your chest open for as long as you can. Imagine a string pulling the crown of your head forward as another pulls your tailbone back.
- Step 4: Let Go and Release. Once you’ve hinged as far as you can with a flat back, it’s time to surrender. Allow your spine to round naturally. Let your head and neck hang completely heavy. No tension here. Shake your head “yes” and “no” to ensure you’ve released it.
- Step 5: Place Your Hands. Let your hands fall wherever they land naturally: on blocks, your shins, your ankles, or the floor. The goal is not to touch your feet. It’s to find a sustainable stretch.
- Step 6: Breathe and Hold. Stay here for 5-10 deep breaths (about 30-60 seconds). With every inhale, feel your back body expand. With every exhale, release a little deeper into the pose. Let gravity do the work.
To exit safely, bend your knees, place your hands on your hips, and use an inhale to rise back up with a flat back, leading with your heart. This protects your lumbar spine.
💡 Pro Tip
Use your breath as a tool. On each exhale, consciously soften the muscles in the backs of your legs. Imagine your breath traveling down your spine and out through your hamstrings, carrying tension away with it. This active breathing technique can dramatically deepen your release without any forceful pulling.
Are You Making These 3 Common Uttanasana Mistakes?
I’ve seen these same alignment errors play out in thousands of classes. They not only rob you of the pose’s benefits but can also lead to strain or injury. Here’s what to watch for and how to fix it instantly.
⚠️ Watch Out
Avoid “ego stretching.” This is the dangerous impulse to force your body into a shape it isn’t ready for, just to make it look a certain way (like getting your hands flat on the floor). Your body doesn’t care what the pose looks like; it only cares what it feels like. Pain is a signal to back off, not push through.
| Common Mistake | Incorrect Form (The “Before”) | Correct Alignment (The “After”) |
|---|---|---|
| Rounding the Lower Back | The fold starts by curving the spine immediately, creating a “C” shape. This puts all the pressure on the vulnerable lumbar discs. | The fold initiates from a hip hinge with a long, straight spine. The back only rounds gently at the very end of the movement. |
| Locking the Knees | Legs are ramrod straight, with knees hyperextended. This strains the knee joint and hamstring attachments. | A soft micro-bend is maintained in the knees. This keeps the leg muscles engaged and protects the joints. |
| Cranking the Neck | Trying to look forward or up, creating tension and compression in the cervical spine (neck). | The head and neck are completely relaxed and heavy, hanging freely. The gaze is towards the shins or knees. |
Your Body, Your Fold: Smart Modifications for Every Level
Flexibility isn’t a prerequisite for yoga; it’s a result. The Hands to Feet Pose is for everyone, and modifications are the key to unlocking its benefits safely, no matter your starting point.
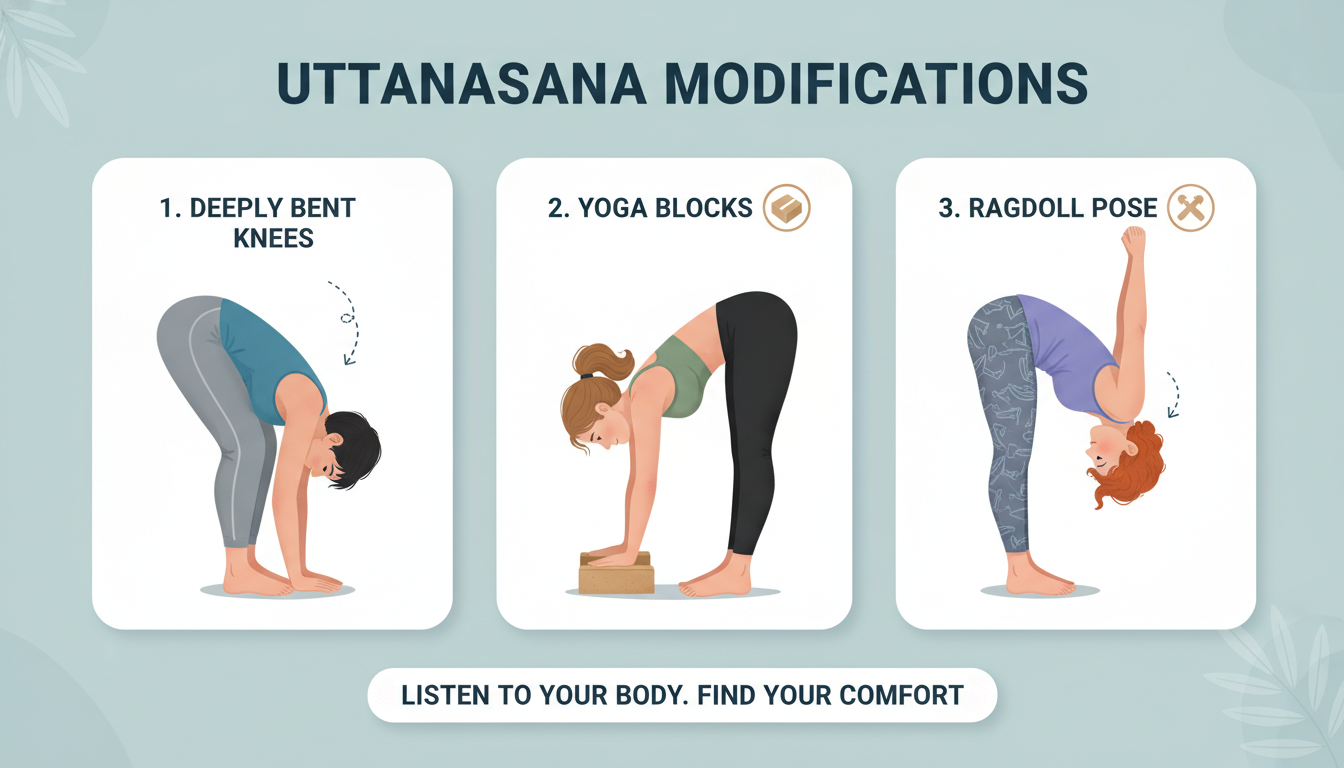
For Beginners & Tight Hamstrings
- Bend Your Knees (A Lot!): This is the single most important modification. Bending your knees generously takes the strain off your lower back and hamstrings, allowing your spine to release fully. You can even rest your torso directly on your thighs for support.
- Use Yoga Blocks: Place two blocks on either side of your feet at their highest setting. Rest your hands on the blocks. This effectively “brings the floor up to you,” allowing you to maintain a long spine while still getting a great stretch.
- Ragdoll Pose: This is a more passive version. Fold forward with deeply bent knees, grab opposite elbows, and gently sway from side to side. It’s incredibly restorative.
💡 Pro Tip
Don’t have blocks? No problem. Use a stack of thick books, a sturdy stool, or even the seat of a chair. In our experience, the best prop is the one you’ll actually use. Get creative to support your practice.
🎯 Key Takeaway
The goal of the Hands to Feet Pose is not to touch your toes, but to create length in your spine and release tension in your hamstrings. Prioritize hinging from the hips and maintaining a micro-bend in your knees over forcing depth. A modified pose done with correct alignment is infinitely more beneficial than a “deeper” pose done with poor form.
Level Up Your Practice: Advanced Variations & Sequencing
Once you’re comfortable with the foundational pose, you can explore variations that challenge your balance, flexibility, and body awareness.
- Padahastasana (Hand Under Foot Pose): From your forward fold, bend your knees enough to slide your hands, palms facing up, all the way under the soles of your feet. Your toes should come to your wrist creases. As you inhale, lengthen your spine. As you exhale, gently press your feet into your hands to deepen the fold.
- Uttanasana with a Twist: From your fold, place your left hand on the floor or a block directly under your face. Bend your left knee and, on an inhale, sweep your right arm up to the sky, opening your chest to the right. Hold for a few breaths, then switch sides. This adds a thoracic spine rotation and targets the IT band.
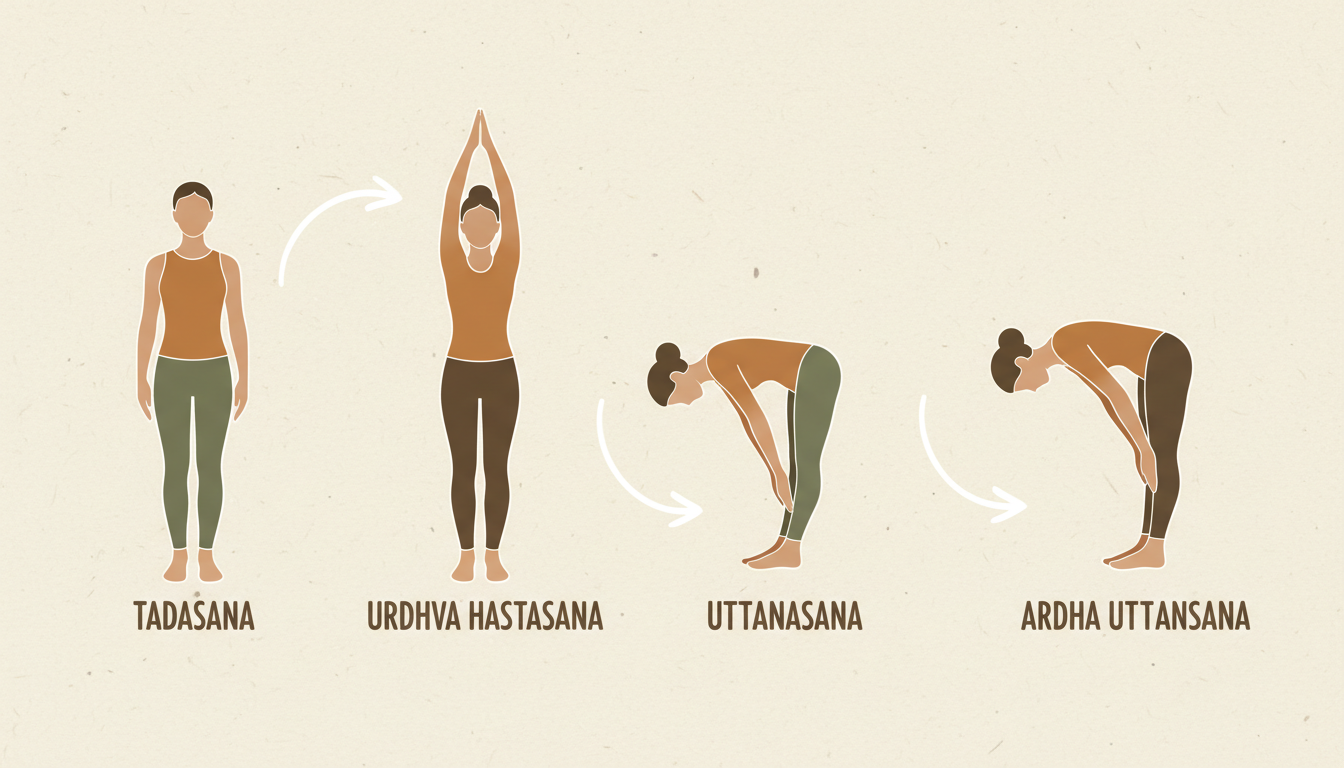
- Sequencing in a Flow: Uttanasana is a key transitional pose. It’s the “fold” in a Sun Salutation, connecting your standing poses to your floor work. Try flowing from Mountain Pose (Tadasana) -> Upward Salute (Urdhva Hastasana) -> Hands to Feet Pose (Uttanasana) -> Half Lift (Ardha Uttanasana) -> Plank Pose.
⚠️ Watch Out
Listen to your body’s signals. If you have a severe back injury (like a herniated disc), glaucoma, or uncontrolled high blood pressure, a deep forward fold may not be appropriate. Consult with a doctor or qualified instructor to find safe alternatives. As Harvard Health points out, while yoga is beneficial, it’s crucial to practice safely.
❓ Frequently Asked Questions
Is it bad if I can’t touch my toes?
Absolutely not! The ability to touch your toes is influenced by genetics, limb length, and daily habits as much as flexibility. The true goal is to feel a productive stretch in your hamstrings and a release in your spine. Use modifications and focus on the sensation, not the destination.
How often should I practice the Hands to Feet Pose?
For tangible results, consistency is key. Practicing daily for even 60 seconds is more effective than one long session per week. It’s a perfect addition to a morning stretch routine or as a cool-down after a workout.
Can this pose really help my lower back pain?
Yes, for many people, it’s incredibly therapeutic. Most chronic lower back pain is linked to tight hamstrings, which pull on the pelvis and misalign the spine. By lengthening these muscles, Uttanasana can provide significant relief. However, if you have an acute disc injury, always consult a professional first.
Why do I feel dizzy when I come up from the pose?
This is common and is usually due to a temporary drop in blood pressure (orthostatic hypotension) from raising your head quickly. The fix is simple: rise up slowly. Bend your knees, bring your hands to your hips, engage your core, and take a full inhale to lift your torso, letting your head be the last thing to come up.
Should my legs be perfectly straight?
No, and for most people, they shouldn’t be. A slight “micro-bend” in the knees is crucial for protecting the joint from hyperextension. If your hamstrings are tight, a much more generous bend is necessary to allow your lower back to release safely.
What’s the difference between Uttanasana and Ardha Uttanasana?
They are two parts of a whole. Uttanasana is the full forward fold with a rounded, released spine. Ardha Uttanasana is the “Half Lift,” where you inhale to lengthen your spine until it’s flat and parallel to the floor, usually with fingertips on shins or the floor. It’s the counter-pose that creates length before you release back into the full fold.
Your Next Step: From Hands to Feet and Beyond
The journey from your hands to your feet is more than a physical distance; it’s a practice of patience, release, and self-awareness. Uttanasana teaches us that true strength often lies in surrender—letting go of tension, releasing stress, and allowing gravity to do its work.
You now have the complete toolkit to master this powerful pose safely and effectively. Remember the core principles: hinge from your hips, keep your knees soft, and let your head go. Don’t chase a specific shape; chase the feeling of release.
Your next step is simple. Stand up, take a deep breath, and fold. Notice what you feel. Make it a daily ritual, and watch how this one simple movement can profoundly change your body and mind.
Read Also:
- Pro Watermark Removal Secrets for 2026
- Average Number Calculator: The Ultimate 2026 Guide
- Master Word’s Change Case Shortcut (Shift+F3) in 2026
- Tons to Yards: Your 2026 Conversion Guide
- Casetext Review 2026: 7 Features Changing Legal Practice
- 7 Ways an Alt Text Generator Boosts Image SEO – Visual Story
- mg/L to mg/kg Conversion: The Expert 2026 Guide
- Unlock Your Pace: 2026 Speed Guide

