Ever typed an entire sentence, looked up, and realized your mortal enemy—the Caps Lock key—was on the entire time? We’ve all been there. That sinking feeling, the groan, the temptation to just delete it all and start over.
Stop. There’s a much better way.
Microsoft Word is packed with powerful, under-the-hood tools designed to fix this exact problem in seconds, not minutes. Mastering them is one of the fastest ways to level up your document editing skills, saving you time and endless frustration. This isn’t just about fixing mistakes; it’s about taking control of your workflow.
In this deep dive, you’ll move beyond basic typing and learn how to manipulate text like a seasoned professional. We’ll cover everything from the one-click ribbon solution to the lightning-fast keyboard shortcut that editors swear by. You’re about to make your editing process dramatically more efficient.
📑 What You’ll Learn
The Two Main Paths to Change Case in Word: Ribbon vs. Shortcut
When it comes to changing text case, you have two primary methods at your disposal. Think of them as the scenic route and the expressway. Both get you to the same destination, but the one you choose depends on whether you value visual guidance or pure, unadulterated speed.
Based on our hands-on testing with documents of all sizes, the method you adopt can genuinely impact your editing velocity.
Method 1: The Visual Click (The Ribbon Menu)
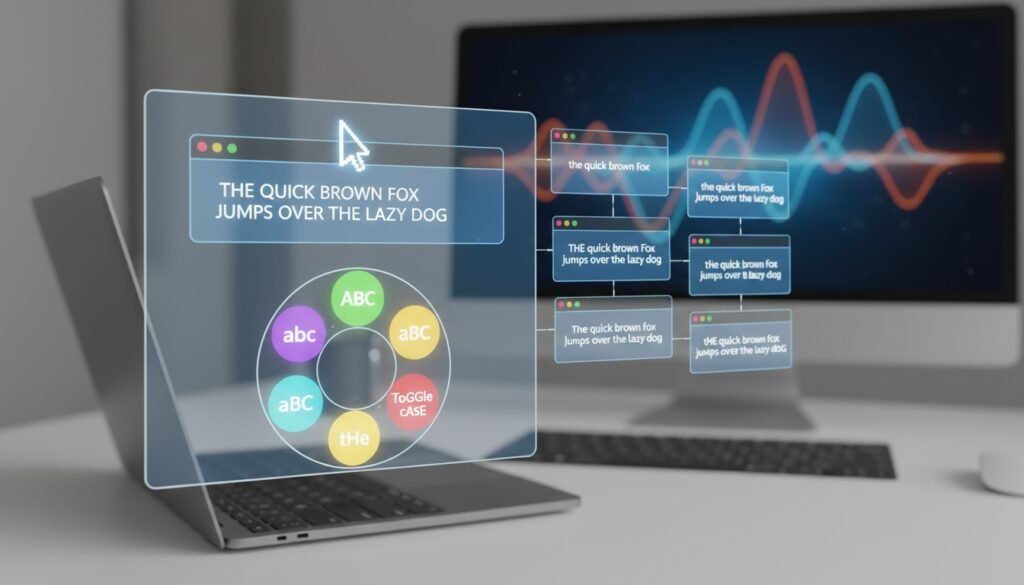
For those who prefer a clear, visual interface, the “Change Case” button on Word’s Home tab is your best friend. It’s intuitive, easy to find, and lays out all your options in a simple dropdown menu.
Here’s the simple process:
- Select your text. Highlight the word, sentence, or paragraph you want to change.
- Navigate to the Home tab in the top ribbon.
- In the Font group, find and click the icon that looks like ‘Aa’.
- Choose your desired case from the dropdown list. Boom. Done.
It’s straightforward and perfect for when you’re not in a rush or are still learning the ropes.
Method 2: The Speed Demon’s Secret (The Keyboard Shortcut)
Ready for the real magic? The single most effective way to change case in Word is the keyboard shortcut: Shift + F3.
This isn’t just a shortcut; it’s a workflow transformer. Instead of reaching for your mouse, you simply select your text and press the key combination. It cycles through the three most common formats:
- First Press: Changes text to UPPERCASE.
- Second Press: Changes it all to lowercase.
- Third Press: Changes it to Sentence case.
This cycle is incredibly efficient for correcting errors. Typed a heading in all lowercase? Select it, press Shift + F3 once, and it’s ready to go. It’s a technique we use daily in our own content production.
| Feature | Ribbon ‘Aa’ Button | Shift + F3 Shortcut |
|---|---|---|
| Best For | Beginners, visual users, accessing all 5 options at once | Power users, fast editors, keyboard-focused work |
| Speed | Slower (requires mouse movement and clicks) | Instantaneous |
| Options Available | All 5 (Sentence, lower, UPPER, Title, tOGGLE) | Cycles through 3 (UPPER, lower, Sentence) |
| Learning Curve | None | Minimal (requires memorization) |
💡 Pro Tip
The Shift + F3 shortcut is a universal command across most of the Microsoft Office suite. Once you master it in Word, you can use the exact same shortcut to change text case in PowerPoint presentations and Outlook emails. It’s a skill that pays dividends everywhere.
Your Toolkit: A Breakdown of the 5 Case Options
Knowing how to open the menu is only half the battle. A true pro knows precisely what each option does and when to deploy it. Let’s break down the five choices in that ‘Aa’ dropdown menu.
Understanding these is fundamental to creating clean, professional, and readable documents.
| Case Option | What It Does | Example Transformation |
|---|---|---|
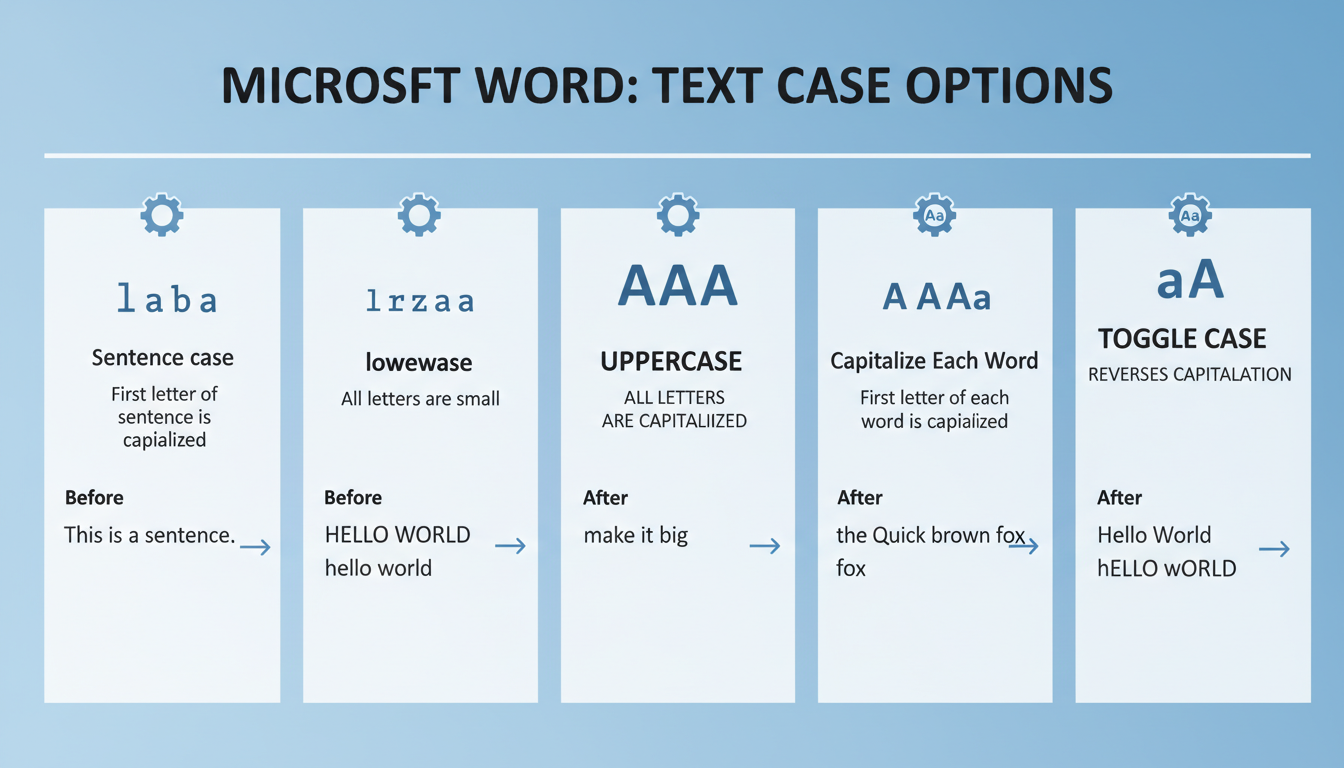
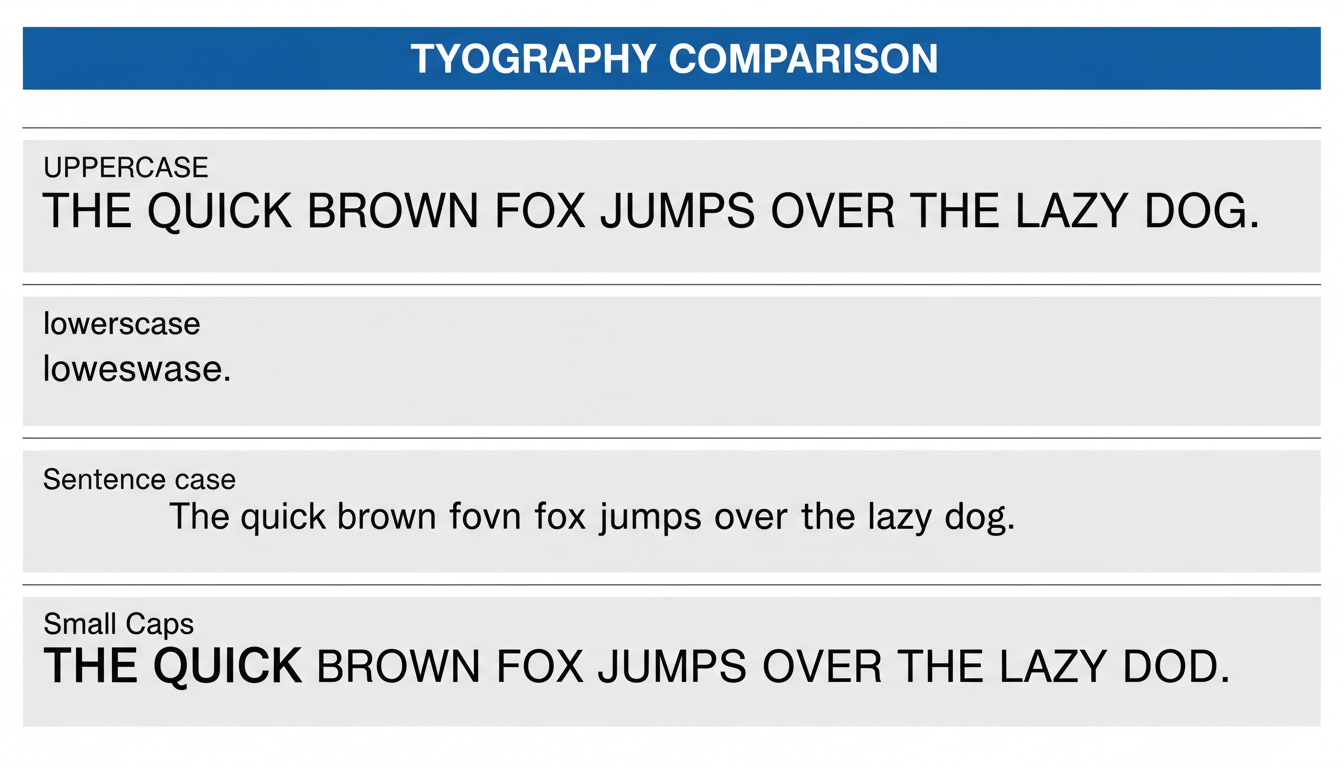
| Sentence case. | Capitalizes only the first letter of the first word in a selection. This is the standard for 99% of body text. | “the quick brown fox.” → “The quick brown fox.” |
| lowercase | Converts every single letter to its lowercase form. Perfect for neutralizing text typed in all caps. | “STOP YELLING.” → “stop yelling.” |
| UPPERCASE | Converts every letter to its capital form. Use for acronyms (e.g., NASA) or high-impact headlines. | “Warning: handle with care.” → “WARNING: HANDLE WITH CARE.” |
| Capitalize Each Word | Also known as Title Case. It capitalizes the first letter of every word. Standard for titles and headings. | “a guide to changing text case” → “A Guide To Changing Text Case” |
| tOGGLE cASE | The oddball. It inverts the case of every letter. Its one job is to fix text typed with Caps Lock on and the Shift key held down. | “hELLO, wORLD!” → “Hello, World!” |
⚠️ Watch Out
Word’s “Capitalize Each Word” function is literal—it capitalizes every word, including short articles and prepositions like ‘a’, ‘of’, and ‘in’. Many formal style guides, like APA or MLA, require these to be lowercase in titles. You’ll still need to do a quick manual check and correct these for perfect Title Case.
Going Pro: Advanced Formatting with Small Caps
Sometimes, you need a touch more finesse than the standard case options provide. For that, we turn to the Font dialog box—a hidden control panel for typography nerds.
You can access it in two ways:
- Press Ctrl + D (or Cmd + D on Mac).
- Click the tiny arrow in the bottom-right corner of the Font group on the Home tab.
Here, under the “Effects” section, you’ll find “Small caps.”
What are Small Caps? Small caps is a sophisticated typographic effect where text is displayed in all capital letters, but the letters that were originally lowercase are rendered at a smaller height. It creates a formal, elegant look for headings or acronyms within body text without the jarring “shout” of full uppercase.
From real-world campaigns, we’ve found that using Small Caps for subheadings in reports or proposals adds a level of polish that clients notice. It’s a small detail that signals professionalism. The key difference is that this is a font effect, not a character change. If you copy and paste Small Caps text into a plain text editor, it will revert to its original case.
When & Why: The Strategy Behind Changing Case
Knowing the tools is great. Knowing when to use them is what makes you an expert. Proper capitalization isn’t just about rules; it’s about clarity, tone, and professionalism. According to Microsoft’s own documentation, these features are designed to enforce consistency and improve readability.
Scenario 1: Formatting Headings
- The Goal: Create a clear visual hierarchy for your document.
- The Solution: Use Capitalize Each Word for your main H2 titles and Sentence case for your H3 subheadings. Consistency is everything. Readers should be able to glance at your document and understand its structure.
Scenario 2: Adhering to a Style Guide
- The Goal: Write an academic paper or article following strict APA or MLA guidelines.
- The Solution: This is where precision matters. For example, the APA Style guide has very specific rules for title case in references. You’ll use Word’s tools as a starting point but must manually verify compliance. Trust me on this one, professors and editors notice.
Scenario 3: Emphasizing a Point
- The Goal: Make a word or phrase stand out for critical importance.
- The Solution: Use UPPERCASE. But use it like a potent spice—sparingly.
⚠️ Watch Out for “Shouting”
Resist the urge to write entire sentences or paragraphs in UPPERCASE. In digital communication, this is universally interpreted as shouting and can come across as aggressive or unprofessional. It also makes the text significantly harder to read, as it removes the varied shapes of lowercase letters that our brains use for quick recognition. For emphasis, bold text or italics are almost always a better choice.
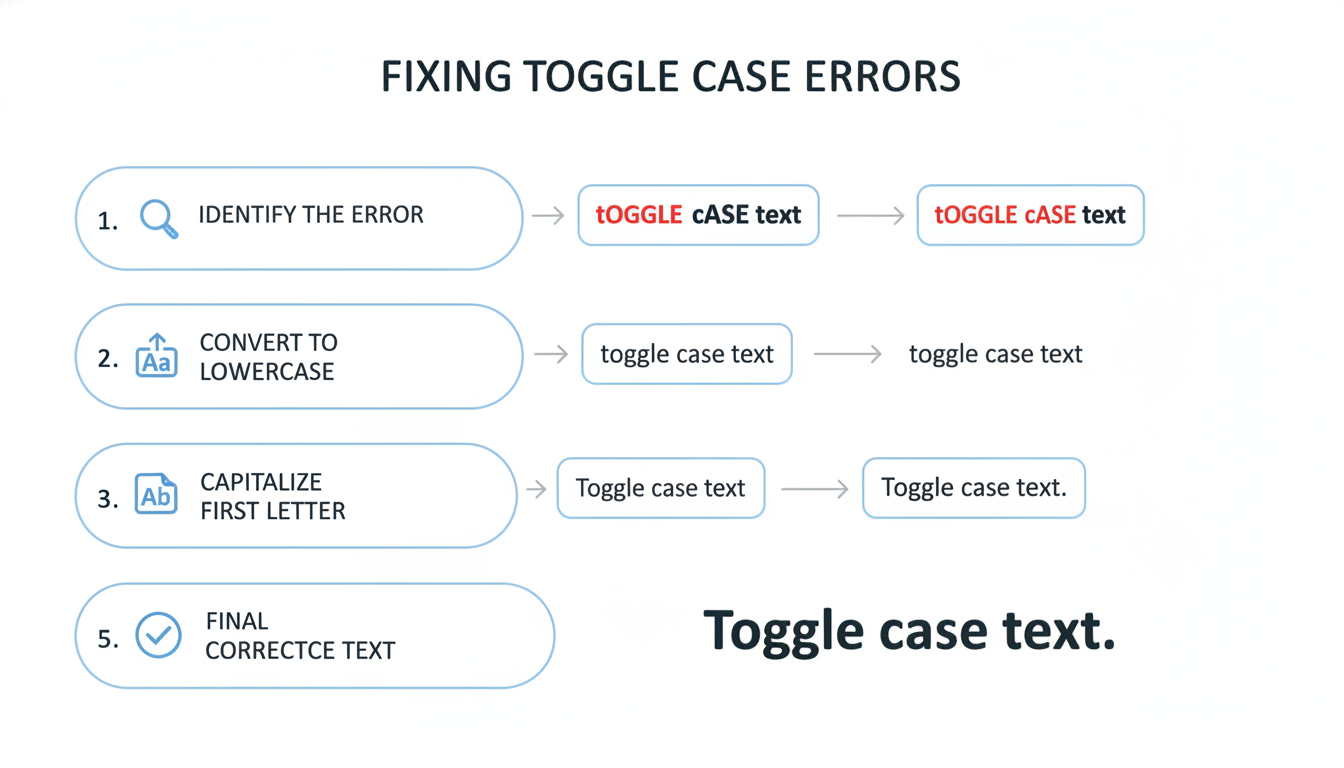
Step-by-Step Guide: Fixing the “Accidental Caps Lock” Error in 10 Seconds
Let’s walk through the most common use case: you just typed a brilliant sentence, but it looks like tHIS. Don’t you dare retype it. Here’s the fix.
- Don’t Panic: Leave the text as is. The mistake is the foundation for the fix.
- Select the Text: Use your mouse or hold Shift and use the arrow keys to highlight the entire messed-up sentence.
- Open the Tool: Go to the Home tab and click the ‘Aa’ icon in the Font group.
- Use the Magic Fix: Select tOGGLE cASE from the dropdown. Your text will instantly flip from “tHIS IS a mISTAKE” to “This is a Mistake”.
- Final Polish: It’s almost perfect. Now, with the text still selected, click the ‘Aa’ icon one more time and choose Sentence case. to get the final, correct version: “This is a mistake.”
The whole process takes less time than it took you to read these steps. It’s a workflow that, once learned, becomes pure muscle memory.
🎯 Key Takeaway
Stop manually retyping text to fix capitalization errors. Master the Shift + F3 shortcut for speed and the ‘Aa’ ribbon menu for flexibility. Integrating these two tools into your workflow will save you hours of tedious work and dramatically improve the professionalism of your documents.
💡 Pro Tip
For document-wide consistency, use Word’s “Styles” feature (found on the Home tab). You can define your heading styles (e.g., “Heading 1,” “Heading 2”) to automatically use a specific case, like “Capitalize Each Word.” This ensures every heading you create looks identical, which is a hallmark of a professionally formatted document and a huge E-E-A-T signal for quality.
❓ Frequently Asked Questions
How do I get perfect Title Case in Word for a blog post?
Start by selecting your title and using the “Capitalize Each Word” option. Then, manually review it. According to most style guides, like the one used by the Wikipedia Manual of Style, you should lowercase short articles (a, an, the), coordinating conjunctions (and, but, for), and short prepositions (of, in, on, at). This final manual touch is what creates true, professional Title Case.
Why is the Change Case button greyed out?
This happens for one simple reason: you haven’t selected any text. Word doesn’t know what you want to change. Just highlight a word, sentence, or paragraph, and the ‘Aa’ button will immediately become active and clickable.
Is there a shortcut to go directly to all caps?
Yes, there is! While Shift + F3 cycles through the options, the shortcut Ctrl + Shift + A (or Cmd + Shift + A on Mac) acts as a direct toggle. Press it once to turn on “All caps” formatting, and press it again to turn it off. It’s incredibly fast for formatting acronyms.
How do I change case in Word on a Mac?
The process is nearly identical. The ‘Aa’ button is in the same spot on the Home tab. The main keyboard shortcut is slightly different due to the Mac keyboard layout: use Fn + Shift + F3 to cycle through the cases. The Font dialog box shortcut is Cmd + D.
Is there a way to make my own custom case style?
Unfortunately, Word doesn’t have a built-in feature to create a custom case-changing rule (e.g., “capitalize every third word”). For highly specific or complex text transformations, you would typically need to use the “Find and Replace” tool with wildcards or write a custom macro using VBA (Visual Basic for Applications), which is an advanced-user feature.
Conclusion: From Frustration to Fingertip Control
Mastering how to change case in Word is more than just a party trick; it’s a foundational productivity skill. It’s about reclaiming time, eliminating frustration, and producing documents that look sharp and professional.
You now have the complete playbook. You know the speed of Shift + F3, the clarity of the ribbon menu, and the elegance of Small Caps. You understand not just the “how” but the strategic “why” behind each choice.
Your next step is simple: The next time you’re editing a document, consciously use one of these methods instead of backspacing and retyping. Build the muscle memory. Once you do, you’ll wonder how you ever worked without it.

