
Let’s be honest: the “single photo” post is dying a slow death. In a feed that scrolls at the speed of light, a standalone image often lacks the context or the punch needed to stop a thumb in its tracks. You have a story to tell, but one frame just isn’t cutting it.
This is where the humble online collage maker transforms from a basic utility into a content powerhouse.
I’ve managed content strategies for brands ranging from boutique e-commerce shops to high-traffic media sites, and here is the reality: visual density wins. Audiences today crave context. They want the “before” and the “after.” They want the vibe, the texture, and the product all in one glance. A well-executed collage isn’t just pretty; it’s efficient communication.
If you think collages are just for teenage bedroom walls or messy birthday shoutouts, think again. In this guide, we are going to dismantle that myth. You’ll learn how to leverage these tools to create professional, magazine-quality visuals that drive engagement and tell a complete story.
📑 What You’ll Learn
Why Visual Density Matters in 2025
The digital landscape has shifted. According to HubSpot marketing statistics, visual content is 40 times more likely to get shared on social media than other types. But it’s not just about having a visual; it’s about the quality of information within that visual.
An online collage maker serves as a bridge between raw photography and professional graphic design. It allows for the synthesis of multiple ideas into one frame, saving space on social media feeds while maximizing engagement.
Here is the thing: attention spans are short. If you can convey a complex narrative—like a recipe, a travel itinerary, or a fitness transformation—in a single image, you win. You are respecting the user’s time while delivering maximum value.
🎯 Key Takeaway
Don’t use collages just to pack more photos into a post. Use them to connect dots for your audience. A great collage answers a question, tells a story, or solves a problem at a single glance.
Essential Features to Look For in a Top-Tier Collage Maker
I’ve tested dozens of these tools over the years. Most are fine. Some are terrible. The best ones—the ones that will actually make your life easier—share a specific set of DNA.
When you are hunting for the perfect online collage maker, look beyond the basic grid layouts. You need a tool that acts more like a design suite than a cookie-cutter app.
| Feature | Why It Matters | The “Pro” Standard |
|---|---|---|
| Customizable Gutters | Controls the white space between images. | Adjustable thickness and color (transparent options are a must). |
| Aspect Ratio Locking | Ensures your collage fits specific platforms (IG Stories vs. Pinterest). | One-click resize for 9:16, 4:5, and 1:1. |
| Layer Management | Allows you to stack text over images or images over backgrounds. | Drag-and-drop layering with “bring to front” capability. |
| DPI Control | Determines if your image looks crisp or pixelated. | Export options up to 300 DPI for print quality. |
Crucially, the magic often happens before the photos are locked into the grid. A high-quality collage maker should include integrated editing tools. If one photo is cool-toned and the next is warm, the collage will look disjointed. It is often helpful to use tools that adjust the brightness and contrast effect of your images to ensure they match visually before finalizing the layout.
10 Creative Ways to Use an Online Collage Maker for Stunning Visuals
Ready to move beyond the basic 4-square grid? Here are ten strategies we use in professional content calendars to keep audiences engaged.
1. The “Vibe Check” Mood Board
Designers and marketers use mood boards to visualize a project’s direction. But you can use them for personal branding too. Combine textures, color swatches, and inspirational imagery to communicate a “feeling” that words cannot capture. This is massive on Pinterest.

2. The Educational Step-by-Step
Instead of a video that requires sound, use a collage to break down a process. Recipe bloggers do this brilliantly: Ingredients -> Prep -> Cooking -> Plated Dish. It’s a visual tutorial that is instantly saveable.
3. The “Before and After” Reveal
Nothing sells a transformation like a side-by-side comparison. Whether it’s home renovation, fitness results, or website redesigns, the juxtaposition is a powerful psychological trigger.
💡 Pro Tip
When doing a Before/After collage, always label them clearly directly on the image. Don’t make the user guess which is which. Use a consistent angle and lighting for both shots to make the transformation credible.
4. The Product “Flat Lay” Deconstructed
Take a chaotic flat lay photo and break it down. Use a collage to feature the main shot in a large cell, with smaller cells zooming in on specific product details or textures. It mimics the experience of shopping in a physical store.
5. The Event Recap
Don’t dump 20 photos into a Facebook album nobody will open. Curate the best 5 moments of an event—the venue, the food, the people, the speaker, and the candid laugh—into one cohesive memory block.
6. The Travel Itinerary
Showcase a destination by grouping images by location or color palette. A collage of “Blue Doors of Santorini” is infinitely more shareable than a random assortment of vacation snaps.
7. The Testimonial Wall
Social proof is currency. Use your collage maker to blend a photo of a happy client with a screenshot of their review and a photo of the result they achieved. It builds trust instantly.
8. The “Get the Look” Fashion Guide
Fashion influencers use this to drive sales. Main photo: The outfit. Side photos: The shoes, the bag, the accessories, and the color palette. It turns a selfie into a shopping resource.
9. Behind-the-Scenes (BTS) Reality
Instagram is for the polished result; Stories are for the mess. Create a collage that contrasts the “Instagram vs. Reality.” It humanizes your brand and builds connection.
10. AI-Enhanced Vision Boards
Sometimes you have the idea but lack the photo. If you are struggling to find specific stock photos for your vision board, consider learning how to generate AI images to create unique, custom elements that fit your collage perfectly.
Collage Maker Design Principles for Maximum Impact
You can have the best software in the world, but if you ignore basic design rules, your collage will look like a ransom note. In our experience, sticking to the Gestalt Principles of Design is the secret sauce. Our brains naturally seek to group similar items to make sense of the world.
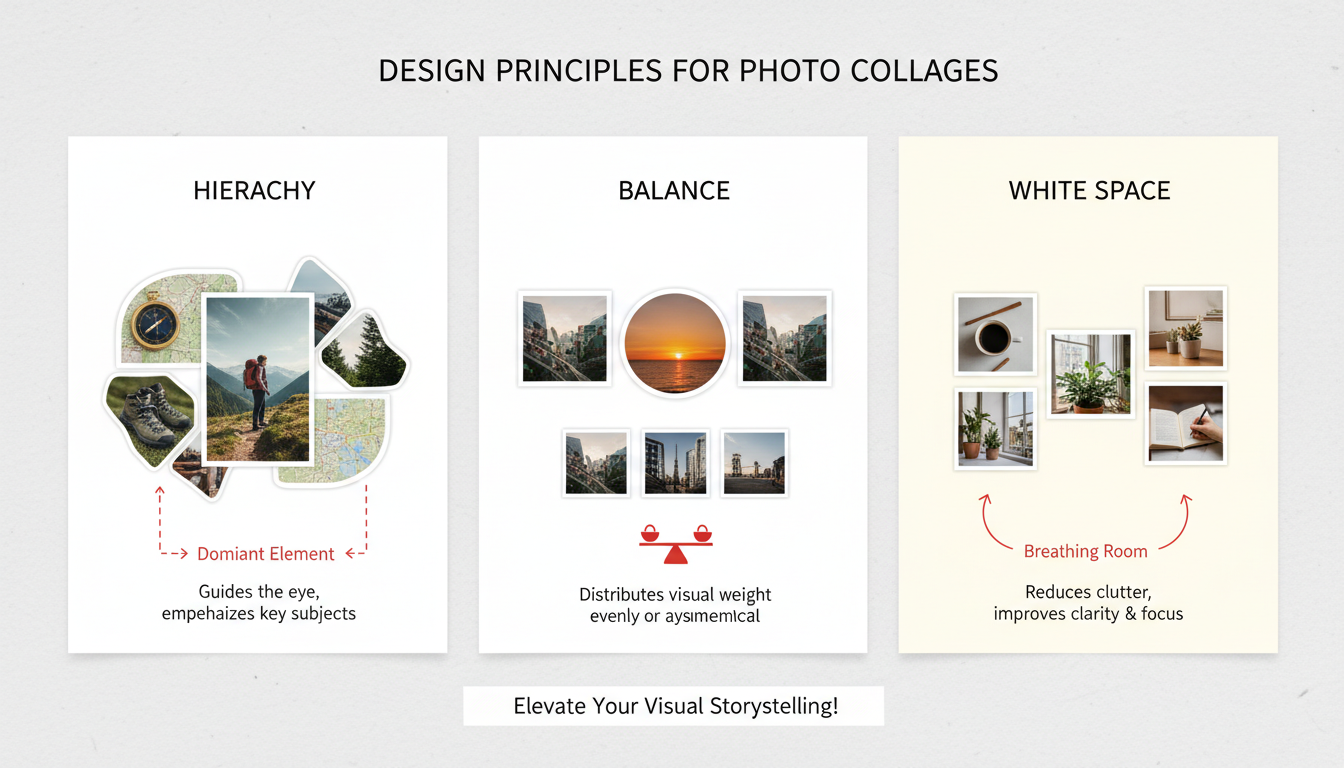
Hierarchy is King
Make the most important image the largest. Your collage maker should allow you to resize cells to create a focal point. If everything is the same size, nothing is important.
Balance the Visual Weight
Imagine your collage is a physical scale. Don’t put all the dark, heavy, complex photos on the left and the light, airy photos on the right. Distribute the “weight” evenly to keep the viewer’s eye moving.
⚠️ Watch Out
Avoid “trapped white space.” This happens when you have awkward gaps between images that don’t align with the outer margins. It makes the design look accidental and messy. Keep your gutters consistent!
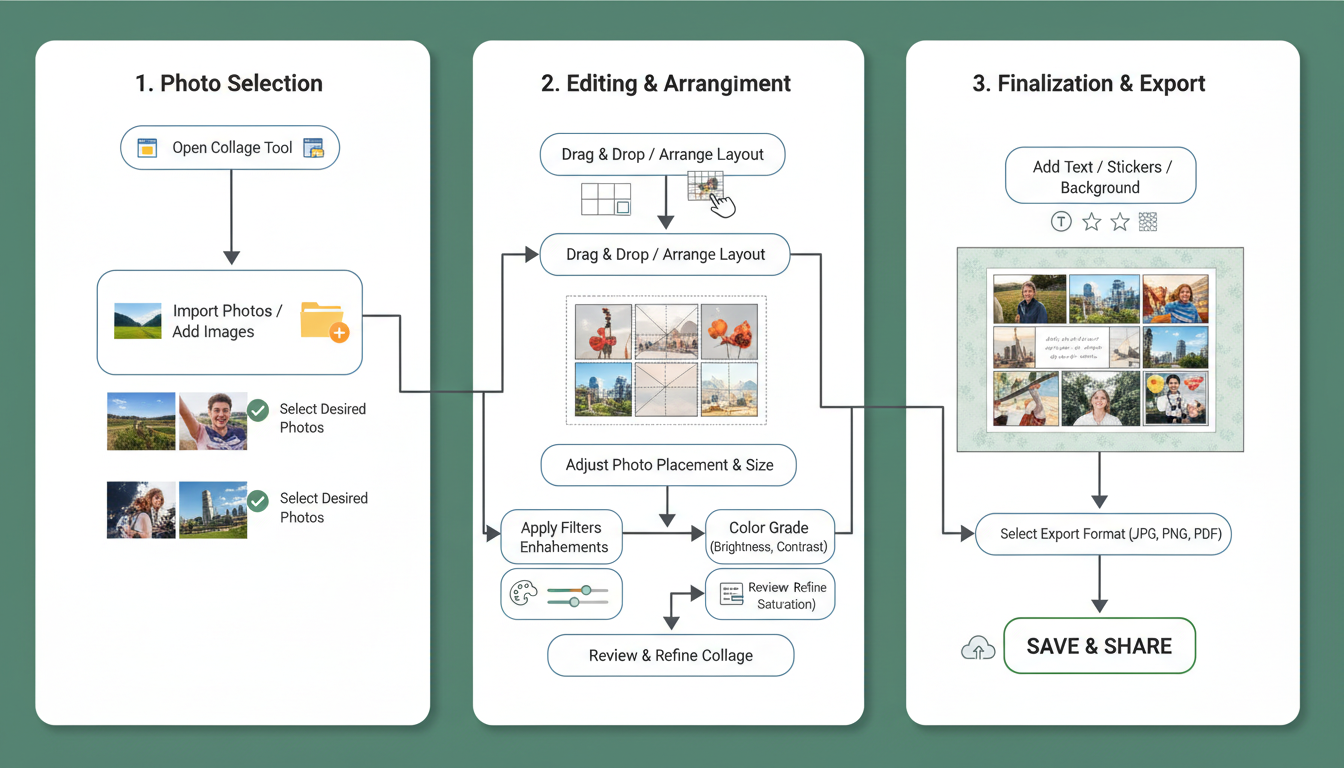
Step-by-Step: Designing Like a Pro
Creating a stunning visual requires more than just dropping photos into slots. Here is my workflow for getting the most out of any collage maker.
- Define the Narrative: Before you open the tool, ask: “What is the headline of this story?” If it’s “Chaos,” use overlapping layers. If it’s “Professionalism,” use a strict grid.
- Curate by Color: Select images that share a common color palette. If they clash, apply a Black & White filter to all of them. It’s the oldest trick in the book, and it works every time.
- Choose the Layout: Select a template that matches your image count. Don’t force 10 photos into a layout meant for 3.
- The “Squint Test”: Once you’ve arranged your photos, squint your eyes until the image blurs. Does one area look too dark? Is the text readable? Adjust accordingly.
- Export Settings: Always export in PNG for digital use (crisper text) and JPG for print.
Conclusion
The online collage maker is more than a layout tool; it is a storytelling device. Whether you are preserving memories or building a business brand, the ability to combine images cohesively is a skill that pays dividends.
Start small. Pick three photos from your camera roll today—maybe your morning coffee, your workspace, and your view out the window. Put them together. Adjust the borders. Suddenly, you haven’t just documented your morning; you’ve shared an atmosphere.
❓ Frequently Asked Questions
What is the best free collage maker available online?
While “best” is subjective, look for tools like Canva or Adobe Express. They offer high-resolution downloads and extensive template libraries without forcing watermarks on your final design.
Can I use a collage maker for commercial purposes?
Generally, yes. However, be careful with the assets provided by the tool. While your photos are yours, the stickers, fonts, or stock backgrounds provided by the app might have licensing restrictions. Always check the Terms of Service.
How do I stop my collage from looking pixelated?
The culprit is usually small source images. Never scale a small image up to fit a collage slot. Always start with high-resolution photos. Also, ensure your export settings are set to “High Quality” or at least 1080p for web use.
Do I need graphic design skills to use these tools?
Not at all. Modern collage makers are built with drag-and-drop interfaces specifically for non-designers. The templates handle the complex math of alignment and spacing for you.
What is the best aspect ratio for Instagram collages?
For Instagram Stories and Reels covers, use 9:16 (1080x1920px). For the main feed, a 4:5 ratio (1080x1350px) takes up the most screen real estate and generally performs better than square (1:1) images.

