We’ve all been there. You look up from the keyboard only to see a full paragraph glaring back at you in solid, screaming UPPERCASE. The Caps Lock key strikes again. Your heart sinks. Do you have to delete it all and start over?
Absolutely not.
Microsoft Word has powerful, built-in tools that can fix this in two seconds flat. But fixing mistakes is just the beginning. Mastering these tools is the difference between fumbling with your text and formatting documents with professional speed and precision.
In this deep dive, we’re going beyond the basics. You’ll learn the lightning-fast keyboard shortcuts editors use, understand the subtle-but-critical difference between “Title Case” and what Word thinks is title case, and discover the pro-level formatting options that will make your documents look sharp and polished.
📑 What You’ll Learn
The 10-Second Fix: The “Change Case” Button on the Ribbon
Let’s start with the most visible tool in your arsenal. If you’re more of a visual person or new to Word, the ‘Change Case’ button on the main toolbar (the “Ribbon”) is your best friend. It’s intuitive, clear, and gives you every option in one place.
Based on our experience training teams, this is the method most people learn first, and for good reason—it’s impossible to miss. Here’s how to use it:
- Select Your Text: Click and drag your mouse to highlight the word, sentence, or paragraph you need to change. Pro tip: press Ctrl + A (or Cmd + A on Mac) to select everything in your document.
- Head to the Home Tab: Make sure you’re on the ‘Home’ tab in the top-left of Word. It’s the default tab, so you’re likely already there.
- Find the Font Group: Look for the section that has the Bold (B), Italic (I), and font size controls.
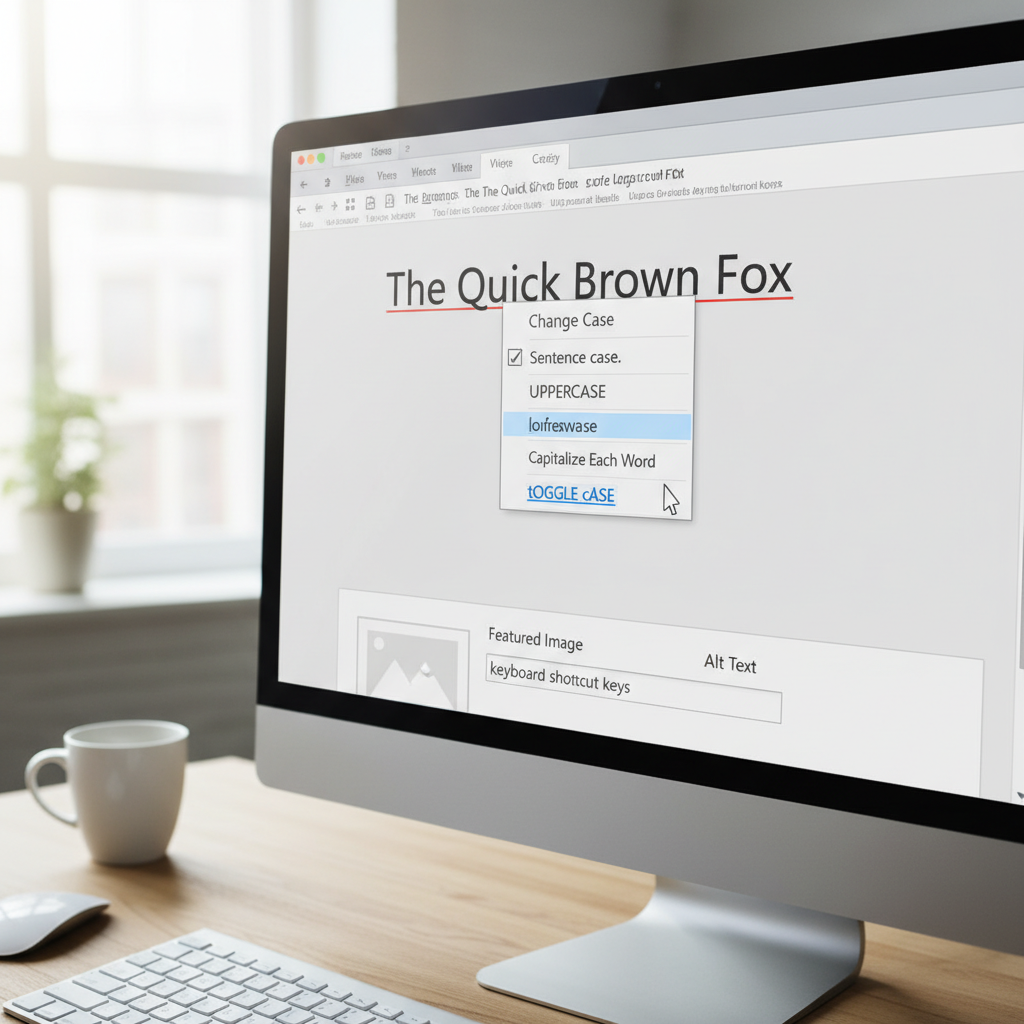
- Click the ‘Aa’ Icon: In that group, you’ll spot an icon with an uppercase ‘A’ and a lowercase ‘a’. That’s the one. Clicking it opens a dropdown menu with five powerful options.
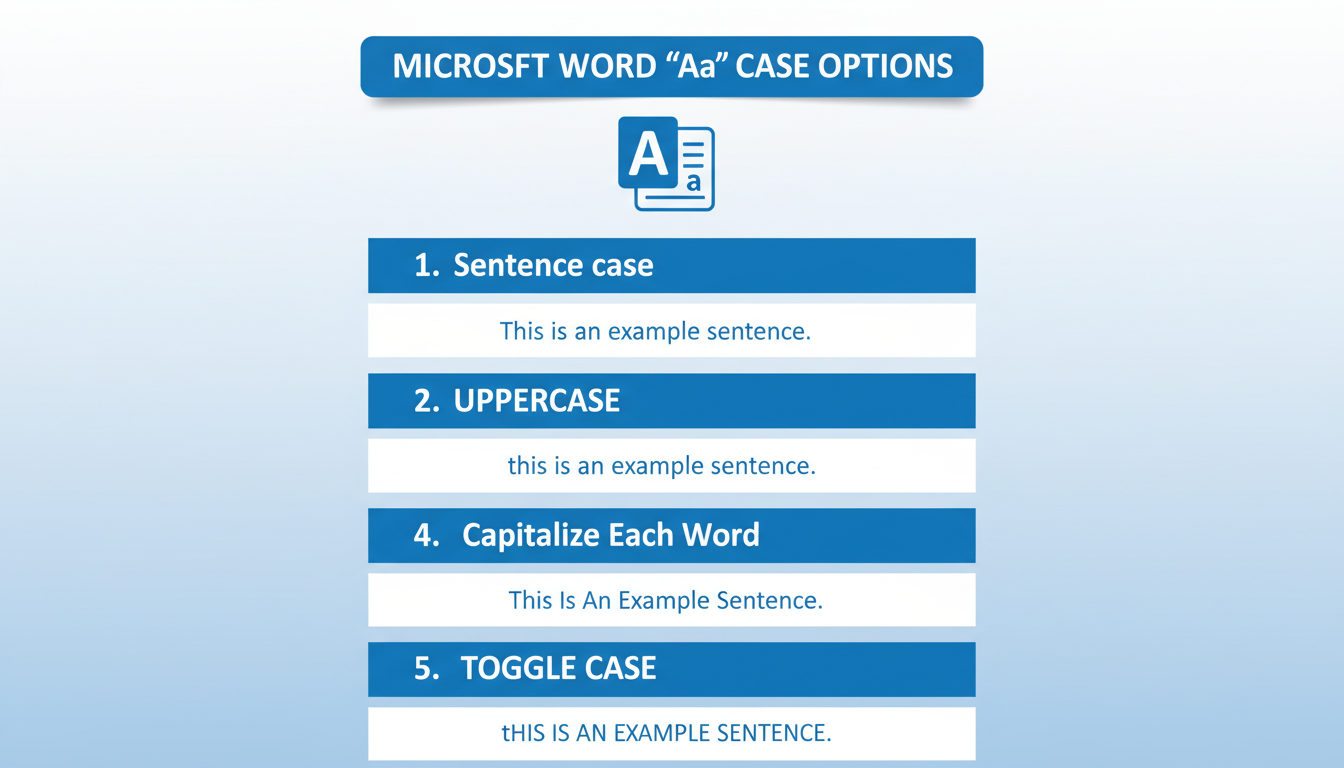
What Each Case Option Does:
- Sentence case. This is your workhorse. It capitalizes the first letter of a sentence and proper nouns, leaving everything else lowercase. Perfect for fixing that accidental all-caps paragraph.
- lowercase. Simple and effective. It converts every single selected letter to lowercase. It’s fantastic for standardizing text you’ve pasted from different sources.
- UPPERCASE. The opposite of lowercase. It makes every letter a capital. Use this for acronyms (like NASA or CEO) and short, impactful headings.
- Capitalize Each Word. Often called Title Case, this capitalizes the first letter of every word. It’s great for headlines and subheadings to give them a formal feel.
- tOGGLE cASE. This one looks bizarre, but it’s a lifesaver. It flips the case of every letter. Its sole purpose is to fix text typed with Caps Lock on by mistake (e.g., “hELLO tHERE” becomes “Hello There”).
💡 Pro Tip
You can add the ‘Change Case’ button to your Quick Access Toolbar (the small bar at the very top of the Word window). Right-click the ‘Aa’ icon and select ‘Add to Quick Access Toolbar’. Now you can change case with a single click, no matter which tab you’re on.
The Pro’s Secret Weapon: The Shift + F3 Shortcut
Clicking through menus is fine. But if you want to edit documents at the speed of thought, you need to keep your hands on the keyboard. For anyone who writes or edits for a living, the Shift + F3 keyboard shortcut is non-negotiable. It’s a muscle-memory move that saves countless seconds, which add up to hours over time.
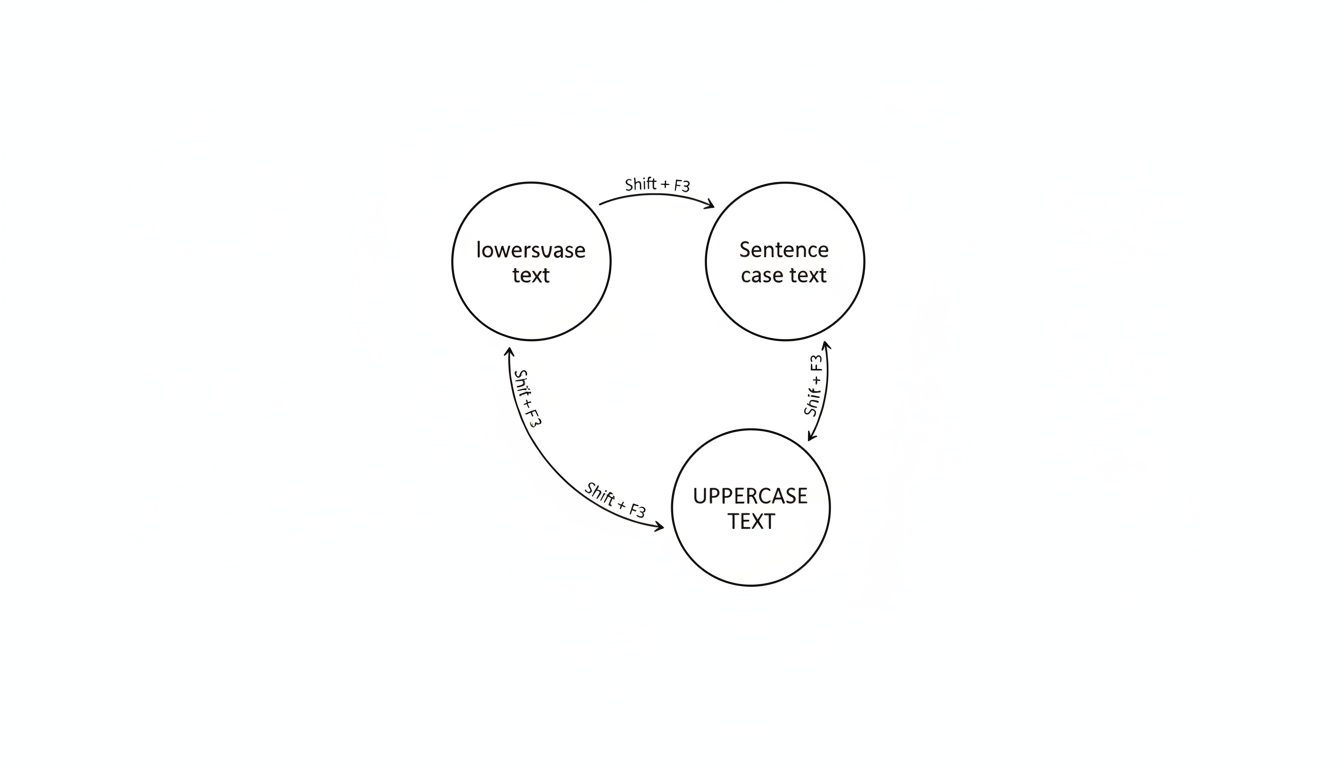
Here’s the magic. Unlike the Ribbon button, this shortcut doesn’t show you a menu. It cycles through the three most common cases with each press.
Here’s the step-by-step workflow we use in our editing process:
- Highlight the text you want to reformat.
- Press Shift + F3 once. Word intelligently changes the case. If your text is all lowercase, it will likely jump to Sentence case.
- Press Shift + F3 again. It will now cycle to the next option, typically all UPPERCASE.
- Press it a third time. It will cycle back to all lowercase.
The cycle is simple and predictable: Sentence case → UPPERCASE → lowercase. Just keep tapping until your text looks exactly right. It feels clunky for the first five minutes, then becomes second nature. Trust me on this one.
For Mac Users: The shortcut is almost identical. You just need to add the ‘Function’ key. Press Fn + Shift + F3 to cycle through the cases.
⚠️ Watch Out
The starting point of the Shift + F3 cycle can sometimes vary depending on the initial capitalization of your selected text. Don’t be alarmed if the first press doesn’t go to Sentence case. Just press it again—you’ll quickly fall into the predictable three-stage loop.
Which Method is Right for You? A Quick Comparison
So, when should you use the Ribbon, and when should you use the shortcut? It all comes down to your task and your personal workflow. Here’s a breakdown to help you decide.
| Method | Speed | Options Available | Best For… |
|---|---|---|---|
| Ribbon ‘Aa’ Button | Slower (requires mouse) | All 5 options (including Title and Toggle Case) | Beginners, visual users, or when you specifically need Title or Toggle Case. |
| Shift + F3 Shortcut | Lightning Fast | Cycles through 3 core options (Sentence, UPPER, lower) | Power users, editors, and writers who want to maintain typing flow and make rapid changes. |
| Font Dialog Box | Slowest (multiple clicks/keys) | Stylistic effects (Small Caps, All Caps) | Designers and typographers needing advanced formatting for headings or formal documents. |
🎯 Key Takeaway
For everyday writing and editing, make it your mission to master the Shift + F3 shortcut. It’s the single biggest productivity boost for text formatting in Word. For specific, less common cases like ‘tOGGLE cASE’ or ‘Small caps’, use the Ribbon or Font Dialog Box.
Advanced Typography: Small Caps vs. All Caps
Sometimes, you need more than just a basic case change. You need a specific style. Hidden inside Word’s Font dialog box are two options that offer more typographic control: ‘All caps’ and ‘Small caps’.
To find them, select your text and press Ctrl + D (or Cmd + D on a Mac). This opens the Font settings window.
Here’s the thing: these two options look similar, but they serve very different aesthetic purposes.
- All caps: This is just a different way to get to the ‘UPPERCASE’ option. It makes every letter a full-height capital. It’s loud and demands attention.
- Small caps: This is a sophisticated design choice. It converts lowercase letters into shorter capital letters, creating a refined and elegant look without the “shouting” effect of full caps. It’s often used for subheadings, author names in bibliographies, or acronyms within a sentence to help them blend in more smoothly.
According to typographic best practices, true-drawn small caps (which are included in high-quality fonts) are designed to match the weight and style of the lowercase letters. Word can also create “faux” small caps by simply shrinking the full caps, which works in a pinch but isn’t as visually balanced. For more on the principles of typography, the Wikipedia entry on Small Caps offers a great historical and technical overview.
The Strategy of Capitalization: When and Why to Use Each Case
Knowing how to change case in Word is easy. Knowing why is what elevates your writing. Proper capitalization isn’t just about grammar; it’s about clarity, professionalism, and tone.
The “Capitalize Each Word” Trap
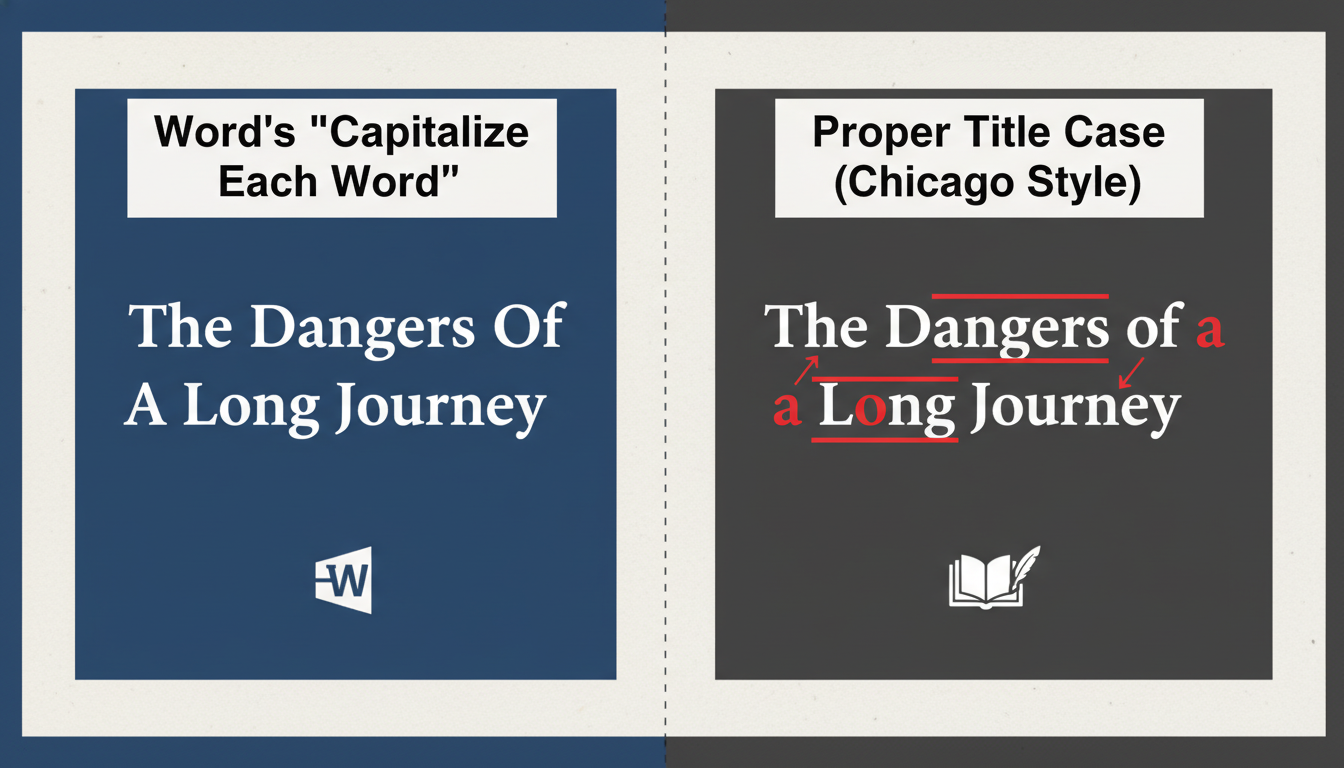
Here’s a common mistake I’ve seen in countless reports and articles. A user wants a headline in Title Case, so they use Word’s “Capitalize Each Word” option. The result?
The Lord Of The Rings: A Guide To Middle-Earth
It looks… wrong. That’s because Word’s tool is a blunt instrument. It capitalizes every word. True Title Case, as defined by style guides like APA or the Chicago Manual of Style, is more nuanced. It dictates that small articles (‘a’, ‘the’), prepositions (‘of’, ‘in’, ‘on’), and conjunctions (‘and’, ‘but’) should remain lowercase unless they are the first or last word.
Let’s see the difference side-by-side.
| Formatting Method | Example Result | Notes |
|---|---|---|
| Word’s “Capitalize Each Word” | A Tale Of Two Cities | Technically incorrect for formal writing. Fast but unprofessional. |
| True Title Case (Chicago Style) | A Tale of Two Cities | Correct and professional. Requires manual adjustment after using Word’s tool. |
💡 Pro Tip
Use “Capitalize Each Word” to do the heavy lifting, then quickly scan and manually change the small articles, prepositions, and conjunctions to lowercase. This “hybrid” approach is much faster than capitalizing each word by hand.
⚠️ Watch Out for ALL CAPS Overload
Writing entire sentences or paragraphs in uppercase is the digital equivalent of shouting. It drastically reduces readability because all the letters are the same height, removing the unique shapes our brains use to scan words quickly. Reserve it for acronyms, short warnings (‘DANGER’), or very brief, high-impact headings.
❓ Frequently Asked Questions
What is the fastest way to change case in Word?
The undisputed champion for speed is the keyboard shortcut: Shift + F3 (or Fn + Shift + F3 on a Mac). It allows you to cycle through the three main cases (Sentence, UPPERCASE, lowercase) without ever taking your hands off the keyboard.
How do I get proper Title Case for an article heading?
There’s a two-step process. First, highlight your heading and use the ‘Capitalize Each Word’ option from the ‘Aa’ button on the Home tab. Second, manually go through and change short words (like ‘of’, ‘the’, ‘a’, ‘in’, ‘and’) to lowercase to comply with standard style guides. For specific rules, always consult an official source like the APA Style guide.
Can I undo a case change in Word?
Yes! Absolutely. If you make a change you don’t like, just press Ctrl + Z (or Cmd + Z on a Mac) to instantly undo your last action. You can press it multiple times to go back several steps.
Why does the tOGGLE cASE option even exist?
It seems strange, but it has one brilliant function: fixing text typed with the Caps Lock key on by accident. If you type “tHIS lOOKS wEIRD,” selecting it and using tOGGLE cASE will instantly correct it to “This Looks Weird.” It’s a one-trick pony, but it’s a great trick.
Is there a way to make all acronyms in my document uppercase automatically?
Unfortunately, Word doesn’t have a built-in “smarts” feature to do this in one click. However, you can use the ‘Find and Replace’ tool (Ctrl + H). In the ‘Find what’ box, type the lowercase acronym (e.g., ‘nasa’). In the ‘Replace with’ box, type the uppercase version (‘NASA’). Then click ‘Replace All’. You’ll have to do this for each acronym, but it’s much faster than hunting for them manually.
Stop Retyping, Start Formatting
There you have it. Changing text case in Word is a simple task, but mastering it is a skill that separates the amateurs from the pros. You’re no longer at the mercy of the Caps Lock key. You now have a complete toolkit to handle any text formatting challenge that comes your way.
Forget tedious retyping. Your new goal is to make Shift + F3 an automatic reflex. Start using it today. You’ll be amazed at how much smoother and faster your writing and editing process becomes. Now go create some beautifully formatted documents.

